Copyright © 2026 Akamai Technologies Canada Inc.
Permission is granted to copy, distribute and/or modify this document under the terms of the GNU Free Documentation License, Version 1.2 or any later version published by the Free Software Foundation; with no Invariant Sections, no Front-Cover Texts, and no Back-Cover Texts. A copy of the license is included in the section entitled "GNU Free Documentation License".
The fonts used in this guide are licensed under the SIL Open Font License, Version 1.1. This license is available with a FAQ at: http://scripts.sil.org/OFL
Copyright © Raph Levien, http://levien.com/, with Reserved Font Name: "Inconsolata".
1. About this Guide
This guide provides technical documentation for customizing and extending PacketFence. It covers REST API integration, captive portal theming and functionality modifications, SNMP module development, adding support for new network equipment, and core application code customizations. Essential for integrators, developers extending PacketFence functionality, and organizations requiring specialized implementations.
Find the latest version at https://www.packetfence.com/docs/
1.1. Other Guides
- Clustering Guide
-
Comprehensive guide for setting up active/active clustering environments with HAProxy load balancing, Keepalived for high availability, and Galera database clustering. Includes advanced configuration for layer-3 clusters and troubleshooting cluster synchronization issues.
- Installation Guide
-
Complete installation and configuration guide covering standalone deployments, system requirements, network planning, authentication integration (Active Directory, LDAP, RADIUS), certificate management, and initial system setup. Includes troubleshooting and advanced configuration topics.
- Network Devices Configuration Guide
-
Device-specific configuration instructions for over 80 supported network vendors including switches (802.1X, MAC authentication, VLAN assignment), wireless controllers and access points. Covers RADIUS, SNMP configuration and integration with various network equipment manufacturers.
- Upgrade Guide
-
Step-by-step upgrade procedures with version-specific compatibility changes, manual configuration migration steps, database schema updates, and critical upgrade notes. Includes troubleshooting for common upgrade issues and rollback procedures.
1.2. Other sources of information
- https://www.packetfence.com/news
-
Release announcements with detailed feature descriptions, performance improvements, security updates, and comprehensive bug fix listings organized by PacketFence version.
- PacketFence Users Mailing List
-
Community support forum for installation help, configuration questions, troubleshooting assistance, and best practices discussions. Active community of users and developers providing peer-to-peer support.
- PacketFence Announcements
-
Public announcements including new releases, security warnings and important updates regarding PacketFence. Low-traffic list for staying informed about major PacketFence developments.
- PacketFence Development
-
Discussion of PacketFence development including feature requests, architectural discussions, patch submissions and development coordination. For developers contributing to PacketFence core.
Package and release tarballs include the PacketFence guide files.
2. Creating a new Switch via a Template
2.1. Using web admin
You can directly create or edit switch templates in Configuration →
Integration → Switch Templates menu.
2.2. Using CLI
To create a new Switch Template you must create a template file in the
/usr/local/pf/lib/pf/Switch directory.
The file must have the following pattern
/usr/local/pf/lib/pf/Switch/<Vendor>/<SwitchName>.def.
For example to create a template for the vendor Cyberdyne and switch
Switchinator 800.
The file name is
/usr/local/pf/lib/pf/Switch/Cyberdyne/Switchinator800.def
The file name must must only consist of alphanumeric characters and under scores
and must begin with a letter.
Once you have completed your switch template, you will need to perform the following commands so it can be used:
/usr/local/pf/addons/dev-helpers/bin/generator-template-switches-defaults.pl/usr/local/pf/bin/pfcmd configreload hard/usr/local/pf/bin/pfcmd service pf restart
The file consist of parameter names and their values. There is no sections but RADIUS scope parameters act like this.
No scopes are inherited from a base switch template, you need to define each scope you want to use.
You can find a full working example
below. Other examples are available in
/usr/local/pf/lib/pf/Switch/ folder.
2.3. Required Parameters
- description - The description of the switch.
- radiusDisconnect - The RADIUS disconnect methods to use. Must be one of the following values coa|disconnect|coaOrDisconnect .
2.4. RADIUS scope Parameters
- acceptVlan - Attributes for accept vlan scope
- acceptRole - Attributes for accept role scope.
- reject - Attributes for rejection scope.
- disconnect - Attributes for disconnect scope (required if radiusDisconnect is 'disconnect' or 'coaOrDisconnect')
- coa - Attributes for CoA scope (required if radiusDisconnect is 'coa' or 'coaOrDisconnect')
- voip - Attributes for VOIP scope (If VOIP is enabled)
- bounce - Attributes for bounce scope
2.5. Additional parameters
-
snmpDisconnect - If SNMP protocol should be use to disconnect (values:
enabledordisabled)
2.7. Defining RADIUS Attributes
scopeName = <<EOTAttribute-Name1 = value1Attribute-Name2 = value2EOT
2.8. Dynamic RADIUS Attribute Value Syntax
Some values depends on the context of the current request. So here is mini templating language to format values.
-
Text replacement:
$name -
Embedded text replacement:
start-${name}-end -
Functions:
${f1("",$var, f2())}
2.8.1. Available variables for RADIUS scope
- acceptRole - (Same as acceptVlan)
- reject - (Same as acceptVlan)
-
acceptVlan
- autoreg
- connection_sub_type
- connection_type
- eap_type
- fingerbank_info.device_name
- fingerbank_info.device_fq
- fingerbank_info.device_hierarchy_names
- fingerbank_info.device_hierarchy_ids
- fingerbank_info.score
- fingerbank_info.version
- fingerbank_info.mobile
- ifDesc
- ifIndex
- isPhone
- last_accounting.acctsessionid
- last_accounting.username
- locationlog.connection_sub_type
- locationlog.connection_type
- locationlog.dot1x_username
- locationlog.end_time
- locationlog.ifDesc
- locationlog.mac
- locationlog.port
- locationlog.realm
- locationlog.role
- locationlog.session_id
- locationlog.ssid
- locationlog.start_time
- locationlog.stripped_user_name
- locationlog.switch
- locationlog.switch_ip
- locationlog.switch_ip_int
- locationlog.switch_mac
- locationlog.vlan
- locationlog.voip
- mac
- nas_port_id
- nas_port_type
- node_info.autoreg
- node_info.status
- node_info.bypass_vlan
- node_info.bandwidth_balance
- node_info.regdate
- node_info.bypass_role
- node_info.device_class
- node_info.device_type
- node_info.device_version
- node_info.device_score
- node_info.pid
- node_info.machine_account
- node_info.category
- node_info.mac
- node_info.last_arp
- node_info.last_dhcp
- node_info.user_agent
- node_info.computername
- node_info.dhcp_fingerprint
- node_info.detect_date
- node_info.voip
- node_info.notes
- node_info.time_balance
- node_info.sessionid
- node_info.dhcp_vendor
- profile._access_registration_when_registered
- profile._always_use_redirecturl
- profile._autoregister
- profile._block_interval
- profile._description
- profile._dot1x_recompute_role_from_portal
- profile._dot1x_unset_on_unmatch
- profile._dpsk
- profile._locale
- profile._login_attempt_limit
- profile._logo
- profile._name
- profile._network_logoff
- profile._network_logoff_popup
- profile._preregistration
- profile._redirecturl
- profile._reuse_dot1x_credentials
- profile._root_module
- profile._self_service
- profile._sms_pin_retry_limit
- profile._sms_request_limit
- profile._status
- profile._unreg_on_acct_stop
- profile._vlan_pool_technique
- radius_request.<Radius Attribute Name>
- realm
- session_id
- source_ip
- ssid
- stripped_user_name
- switch._ExternalPortalEnforcement
- switch._RoleMap
- switch._VpnMap
- switch._SNMPAuthPasswordRead
- switch._SNMPAuthPasswordTrap
- switch._SNMPAuthPasswordWrite
- switch._SNMPAuthProtocolRead
- switch._SNMPAuthProtocolTrap
- switch._SNMPAuthProtocolWrite
- switch._SNMPCommunityRead
- switch._SNMPCommunityTrap
- switch._SNMPCommunityWrite
- switch._SNMPEngineID
- switch._SNMPPrivPasswordRead
- switch._SNMPPrivPasswordTrap
- switch._SNMPPrivPasswordWrite
- switch._SNMPPrivProtocolRead
- switch._SNMPPrivProtocolTrap
- switch._SNMPPrivProtocolWrite
- switch._SNMPUserNameRead
- switch._SNMPUserNameTrap
- switch._SNMPUserNameWrite
- switch._SNMPVersion
- switch._SNMPVersionTrap
- switch._TenantId
- switch._UrlMap
- switch._VlanMap
- switch._VoIPEnabled
- switch._cliEnablePwd
- switch._cliPwd
- switch._cliTransport
- switch._cliUser
- switch._coaPort
- switch._controllerIp
- switch._deauthMethod
- switch._disconnectPort
- switch._id
- switch._inlineTrigger
- switch._ip
- switch._macSearchesMaxNb
- switch._macSearchesSleepInterval
- switch._mode
- switch._roles
- switch._switchIp
- switch._switchMac
- switch._uplink
- switch._useCoA
- switch._vlans
- switch._wsPwd
- switch._wsTransport
- switch._wsUser
- switch_ip
- switch_mac
- time
- user_name
- user_role
- vlan
- wasInline
-
coa
- last_accounting.acctsessionid
- last_accounting.username
- mac
- locationlog.connection_sub_type
- locationlog.connection_type
- locationlog.dot1x_username
- locationlog.end_time
- locationlog.ifDesc
- locationlog.mac
- locationlog.port
- locationlog.realm
- locationlog.role
- locationlog.session_id
- locationlog.ssid
- locationlog.start_time
- locationlog.stripped_user_name
- locationlog.switch
- locationlog.switch_ip
- locationlog.switch_ip_int
- locationlog.switch_mac
- locationlog.vlan
- locationlog.voip
- role
- time
-
disconnect
- disconnectIp
- last_accounting.acctsessionid
- last_accounting.username
- locationlog.connection_sub_type
- locationlog.connection_type
- locationlog.dot1x_username
- locationlog.end_time
- locationlog.ifDesc
- locationlog.mac
- locationlog.port
- locationlog.realm
- locationlog.role
- locationlog.session_id
- locationlog.ssid
- locationlog.start_time
- locationlog.stripped_user_name
- locationlog.switch
- locationlog.switch_ip
- locationlog.switch_ip_int
- locationlog.switch_mac
- locationlog.vlan
- locationlog.voip
- mac
- time
-
voip
- switch._ExternalPortalEnforcement
- switch._RoleMap
- switch._VpnMap
- switch._SNMPAuthPasswordRead
- switch._SNMPAuthPasswordTrap
- switch._SNMPAuthPasswordWrite
- switch._SNMPAuthProtocolRead
- switch._SNMPAuthProtocolTrap
- switch._SNMPAuthProtocolWrite
- switch._SNMPCommunityRead
- switch._SNMPCommunityTrap
- switch._SNMPCommunityWrite
- switch._SNMPEngineID
- switch._SNMPPrivPasswordRead
- switch._SNMPPrivPasswordTrap
- switch._SNMPPrivPasswordWrite
- switch._SNMPPrivProtocolRead
- switch._SNMPPrivProtocolTrap
- switch._SNMPPrivProtocolWrite
- switch._SNMPUserNameRead
- switch._SNMPUserNameTrap
- switch._SNMPUserNameWrite
- switch._SNMPVersion
- switch._SNMPVersionTrap
- switch._TenantId
- switch._UrlMap
- switch._VlanMap
- switch._VoIPEnabled
- switch._cliEnablePwd
- switch._cliPwd
- switch._cliTransport
- switch._cliUser
- switch._coaPort
- switch._controllerIp
- switch._deauthMethod
- switch._disconnectPort
- switch._id
- switch._inlineTrigger
- switch._ip
- switch._macSearchesMaxNb
- switch._macSearchesSleepInterval
- switch._mode
- switch._roles
- switch._switchIp
- switch._switchMac
- switch._uplink
- switch._useCoA
- switch._vlans
- switch._wsPwd
- switch._wsTransport
- switch._wsUser
- time
- vlan
-
bounce
- disconnectIp
- ifIndex
- last_accounting.acctsessionid
- last_accounting.username
- locationlog.connection_sub_type
- locationlog.connection_type
- locationlog.dot1x_username
- locationlog.end_time
- locationlog.ifDesc
- locationlog.mac
- locationlog.port
- locationlog.realm
- locationlog.role
- locationlog.session_id
- locationlog.ssid
- locationlog.start_time
- locationlog.stripped_user_name
- locationlog.switch
- locationlog.switch_ip
- locationlog.switch_ip_int
- locationlog.switch_mac
- locationlog.vlan
- locationlog.voip
- mac
- switch._cliEnablePwd
- switch._cliPwd
- switch._cliTransport
- switch._cliUser
- switch._coaPort
- switch._controllerIp
- switch._deauthMethod
- switch._disconnectPort
- switch._ExternalPortalEnforcement
- switch._id
- switch._inlineTrigger
- switch._ip
- switch._macSearchesMaxNb
- switch._macSearchesSleepInterval
- switch._mode
- switch._RoleMap
- switch._VpnMap
- switch._roles
- switch._SNMPAuthPasswordRead
- switch._SNMPAuthPasswordTrap
- switch._SNMPAuthPasswordWrite
- switch._SNMPAuthProtocolRead
- switch._SNMPAuthProtocolTrap
- switch._SNMPAuthProtocolWrite
- switch._SNMPCommunityRead
- switch._SNMPCommunityTrap
- switch._SNMPCommunityWrite
- switch._SNMPEngineID
- switch._SNMPPrivPasswordRead
- switch._SNMPPrivPasswordTrap
- switch._SNMPPrivPasswordWrite
- switch._SNMPPrivProtocolRead
- switch._SNMPPrivProtocolTrap
- switch._SNMPPrivProtocolWrite
- switch._SNMPUserNameRead
- switch._SNMPUserNameTrap
- switch._SNMPUserNameWrite
- switch._SNMPVersion
- switch._SNMPVersionTrap
- switch._switchIp
- switch._switchMac
- switch._TenantId
- switch._uplink
- switch._UrlMap
- switch._useCoA
- switch._VlanMap
- switch._vlans
- switch._VoIPEnabled
- switch._wsPwd
- switch._wsTransport
- switch._wsUser
- time
2.8.2. Available functions
-
macToEUI48($mac)- format a mac to AA-BB-CC-DD-FF-EE format -
uc($string)- uppercases a string -
lc($string)- lowercases a string -
log($string)- log a message to the log -
substr($str, $offset, $len)- Extracts a substring from a string -
split($sep, $str)- Split a string by a seperator. -
join($sep, $a, $b, ..)- Join a list of string with a seperator. -
replace($str, $old, $new)- Replace the old string with a new string.
2.8.3. Full Working Example
description = The Switchinator 800radiusDisconnect = disconnectacceptVlan = <<EOTTunnel-Medium-Type = 6Tunnel-Type = 13Tunnel-Private-Group-Id = $vlanEOTacceptRole = <<EOTFilter-Id = $roleEOTreject = <<EOTReply-Message = Hasta la vista, baby.EOTdisconnect = <<EOTCalling-Station-Id= ${macToEUI48($mac)}NAS-IP-Address = $disconnectIpEOTcoa = <<EOTCalling-Station-Id= ${macToEUI48($mac)}NAS-IP-Address = $disconnectIpFilter-Id = $roleEOTbounce= <<EOTCisco-AVPair = subscriber:command=bounce-host-portAcct-Session-Id = $last_accounting.acctsessionidEOT
3. Documentation
The in-depth or more technical documentation is always as close to the code as
possible. Always look at the POD doc [1]. To do so, the preferred way is using the
perldoc command as follows:
perldoc lib/pfconfig/cached.pm
4. Asciidoctor documentation
4.1. Documentation Conventions
4.1.1. Shell commands in code blocks
-
Remove useless characters in code blocks like
#or$ -
Split long lines with
\
4.1.2. Titles
We use Asciidoctor tags for section titles (headings) in place of AsciiDoc tags, see table below for equivalence:
| Level | AsciiDoc syntax (old) | Asciidoctor syntax (new) |
|---|---|---|
Level 0 (Document title) |
===== |
= |
Level 1 |
----- |
== |
Level 2 |
~~~ |
=== |
Level 3 |
^^^ |
==== |
Level 4 |
+ |
===== |
4.1.3. Other Conventions
\* (asterisk) for important vocabulary. Ex: *This Part* is important
_ (underscore) for menus. Ex: _Configuration → Policies and Access Control → Connection Profile → Profile Name_
backquotes ` for buttons. Ex: Click on `Save`
4.1.4. Inter-document cross references
We use inter-document cross references feature to make links between all PacketFence guides. When we need to link to a specific section of a document, we use automatic anchors feature to have a correct display in PDF.
4.1.5. List of Asciidoctor tags used
Some markup examples used in this overview are based on new Asciidoctor features and they are not a part of the standard set of elements. Please, use the :experimental: tag in the header of your document to enable this functionality.
| Element | Mark-up | Example rendered output |
|---|---|---|
Application name |
No special markup |
The foo application. |
Code blocks |
|
|
Code - inline |
|
|
Command block |
|
|
Command - inline |
|
Use the |
Emphasis for a term |
|
Use this approach. |
| Element | Mark-up | Example rendered output |
|---|---|---|
Filenames or directory paths |
|
Edit the The |
| Element | Mark-up | Example rendered output |
|---|---|---|
GUI Text |
|
The web browser displays 404 for an unreachable URL. |
GUI Button (experimental feature, Asciidoctor only) |
|
Click btn:[Save As] to save the file under a different name. |
GUI Menu (experimental feature, Asciidoctor only) |
|
Navigate to menu:File[Import>Import csv] to import a csv file. |
GUI button and menu (non-experimental) |
|
Navigate to Configuration → Policies and Access Control |
| Element | Mark-up | Example rendered output |
|---|---|---|
Inline Image |
|
|
Block Image |
|
Figure 1. PacketFence
|
Inline operations and user input |
|
The Answer by typing |
| Element | Mark-up | Example rendered output |
|---|---|---|
Keyboard shortcuts (experimental feature, Asciidoctor only) |
|
kbd:[Ctrl+Alt+Del] |
| Element | Mark-up | Example rendered output |
|---|---|---|
Link (external) |
|
| Element | Mark-up | Example rendered output |
|---|---|---|
Lists Do not put steps in bold.
|
|
Ordered list
Unordered list
Definition or labeled list
Checklist
|
| Literal value | ….
The function returns true.
…. |
The function returns true. |
|---|
| Element | Mark-up | Example rendered output |
|---|---|---|
Package |
|
Install the |
Product name |
No special markup. Use {nbsp} in the company and product names. Example: Inverse{nbsp}Inc. |
Inverse Inc. |
Reference to PacketFence guides |
|
See the PacketFence Installation Guide for more information. |
System or software variable to be replaced by the user |
|
Use the following command to roll back a deployment, specifying the deployment name: |
System or software configuration parameter or environment variable |
|
Use the |
System item, daemon, or service |
|
Include the Stop the Start the |
4.2. Checklist to create a new guide
-
❏ create PacketFence_GUIDENAME.asciidoc based on PacketFence Template Guide
-
❏ update
alltarget in Makefile -
❏ update packaging (if necessary)
-
❏ update website listing to add a new guide
5. Development environment setup
Set up your development environment to run sources from /usr/local/pf.
Deploy RHEL 8 or Rocky 8 machine. Other operating systems are not supported for development environments.
Find current devel version number at: https://github.com/inverse-inc/packetfence/blob/devel/conf/pf-release
99.9 as the example version number.Install PacketFence from RPM repository:
yum localinstall https://www.packetfence.org/downloads/PacketFence/RHEL8/packetfence-release-99.9.el8.noarch.rpm -yyum install kernel-devel-$(uname -r) -yyum install packetfence --enablerepo=packetfence --allowerasinggit config --global --add safe.directory /usr/local/pf
Now, you must go through the configurator and validate you can login into the admin interface at the end.
Next, run:
dnf module install nodejs:20bash /usr/local/pf/addons/dev-helpers/setup-dev-env.sh
You will now have to wait for 10-15 minutes after the startup so that all container images are built (they’re built on runtime when using a dev environment)
6. Administration GUI development setup
To start a webpack-dev-server instance for the PacketFence admin interface,
follow these steps:
-
Point
webpack-dev-serverto an already running PacketFence API by setting anVUE_APP_API_SOCKET_ADDRESSenvironment variable. For example,export VUE_APP_API_SOCKET_ADDRESS=localhost:1443 -
Run
cd ./html/pfappserver/root -
Run
npm run serve
You should now have a running instance webpack-dev-server on port 8081.
7. Golang environment
7.1. PacketFence Golang libraries
7.1.1. Basic setup
This is a guide on how to setup/use the PacketFence Golang libraries.
To bootstrap the environment:
cd /usr/local/pf/gomake go-env
To work directly on sources, run:
cd goGO_REPO=${PWD} make go-env
This will install Golang version use to build PacketFence Golang binaries and
check if all modules defined in go.mod are available.
Source the .bashrc to get the new environment variables:
source ~/.bashrc
Get a complete overview of the Golang environment with go env command.
7.1.2. Pulling the dependencies
Dependencies use go modules and will be fetched automatically during build time.
You will also need ipset-devel and pkgconfig libraries
which can be installed using the following command:
yum install ipset-devel pkgconfig
apt install libipset-dev pkg-config
7.1.3. Update dependencies
After adding or removing Golang dependencies, run following command in go directory to update go.mod and go.sum files:
go mod tidy
7.1.4. Building the code
All code should be built into a Caddy middleware which we’ll then use in a
Caddyfile to create our recipes. Only reason for not using Caddy would be that
the binaries doesn’t interact using HTTP (which Caddy can handle at some
point). For now, we’ll focus only on services using HTTP until we’re
confortable with Caddy.
A local version of Caddy is in caddy/caddy. This is a vendored version of Caddy which includes the plugins and middlewares for PacketFence.
In order to build the Caddy HTTP service (pfhttpd):
make pfhttpd
Do the same to build pfdns, pfdhcp, pfdetect and pfstats:
make allmake copy
7.1.5. Creating a service
Once pfhttpd is built, use a Caddyfile to load middleware and bind it on a specific port:
localhost:1234 {logger {requesthistory 100level DEBUG}statsd {proto udpprefix pfsso}pfsso}
This file should be put in /usr/local/pf/conf/caddy-services/pfexample.conf
Note how the logger configuration can be controlled from the Caddyfile. If the middleware (in this example pfsso) uses or calls the logger, it must be declared in the Caddyfile.
If the middleware uses statsd, statsd does not have to be configured in the Caddyfile which will result in the packets just not being sent (a dummy statsd client will be created).
Start pfhttpd with the Caddyfile using the following command:
/usr/local/pf/sbin/pfhttpd -conf/usr/local/pf/conf/caddy-services/pfexample.conf
Once it is ascertained that the service is working correctly, create an instance of pf::services::manager for it. Also create a unitfile for it in conf/systemd like the following:
[Unit]Description=PacketFence Example ServiceWants=packetfence-base.target packetfence-config.servicepacketfence-iptables.serviceAfter=packetfence-base.target packetfence-config.servicepacketfence-iptables.serviceBefore=packetfence-pfexample.service[Service]PIDFile=/usr/local/pf/var/run/pfexample.pidExecStart=/usr/local/pf/sbin/pfhttpd -conf/usr/local/pf/conf/caddy-services/pfexample.confRestart=on-failureSlice=packetfence.slice[Install]WantedBy=packetfence.target
Make sure that the packaging is also updated to copy those files in the /usr/lib/systemd/system directory.
7.1.6. Running the tests
Like the perl unit tests, the Golang tests rely on the presence of the test pfconfig process to execute properly.
In order to start the test pfconfig process:
cd /usr/local/pf/t && ./pfconfig-test
You can proceed to execute all or some of the Golang unit tests:
cd /usr/local/pf/gogo test ./...cd /usr/local/pf/go/firewallsso/libgo test
To run all the tests easily, use:
cd /usr/local/pf/gomake test
8. Code conventions
8.1. Code style
We are slowly migrating away from an automated perltidy code style. The reason
we are not doing another pass of tidy is that it messes up code history and
makes maintainer’s job more complicated than it should be. Every new change uses
the new guidelines so over time the old code style will slowly disappear.
- Lines of 120 character width maximum
- No tab characters
- Stay consistent with surrounding white spaces
-
Document each subroutine in POD format (
perldoc perlpod) -
Use constants instead of hard coded strings or numbers (use
constantorReadonlymodules) -
in object-oriented modules we use CamelCase
[2] notation (ex:
$radiusRequest→getVoIpAttributes();) -
in procedural modules we use Perl’s usual notation (ex:
$node_info{'pid'} = $current_request{'pid'};) -
regular expressions should be documented (with the
/xmodifier)
if ($phone_number =~ /^\(?([2-9]\d{2})\)? # captures first 3 digits allows parens(?:-|.|\s)? # separator -, ., space or nothing(\d{3}) # captures 3 digits(?:-|.|\s)? # separator -, ., space or nothing(\d{4})$ # captures last 4 digits/x) {return "$1$2$3";}
-
SQLshould be capitalized, properly indented and always use named fields (no *)
$node_statements->{'node_add_sql'} = get_db_handle()->prepare(<<'SQL');INSERT INTO node (mac, pid, category_id, status, voip, bypass_vlan,detect_date, regdate, unregdate,user_agent, computername, dhcp_fingerprint,last_arp, last_dhcp,notes) VALUES (?, ?, ?, ?, ?, ?, ?, ?, ?, ?, ?, ?, ?, ?, ?)SQL
9. HTTP JSON API
PacketFence provides an HTTP JSON API which exposes most of its functionality.
The full API specification for:
- the latest stable release is available from: https://packetfence.org/doc/api/
- the latest devel release is available from: https://packetfence.org/doc/api/
The API is exposed on 127.0.0.1 (localhost) as well as the management interface of the server for remote calls. Users access the API on TCP port 9999 over a secure connection (HTTPS).
Authentication can be done using either the webservices credentials or any credentials that are valid on the admin interface.
9.1. How to use the API
9.1.1. On a PacketFence server
The pfperl-api command located in /usr/local/pf/sbin/
directory can be use directly from a PacketFence server to query the API without
having to specify an authentication token
and extra-parameters.
Example to get your general configuration:
/usr/local/pf/sbin/pfperl-api get /api/v1/config/base/general \| python -m json.tool
Example to create a node:
/usr/local/pf/sbin/pfperl-api get -M POST /api/v1/nodes/ \-c '{"mac":"22:33:44:55:66:77","pid":"default"}' \| python -m json.tool
Example to create a node with JSON payload in a dedicated file:
{"mac":"22:33:44:55:66:77","pid":"default"}
cat example.json | \/usr/local/pf/sbin/pfperl-api get -M POST /api/v1/nodes/ \| python -m json.tool
9.1.2. On a different computer
First, get an authentication token with the webservices credentials or an admin account:
curl -X POST "https://PF_MANAGEMENT_IP:9999/api/v1/login" \-H "accept: application/json" \-H "Content-Type: application/json" \-d "{\"username\":\"admin\",\"password\":\"admin\"}" \--insecure |python -m json.tool
You will get following response :
{"token": "MY_TOKEN"}
Then use this token to query the API. The following example fetches the general configuration:
curl -X GET "https://PF_MANAGEMENT_IP:9999/api/v1/config/base/general" \-H "accept: application/json" \-H "Authorization: MY_TOKEN" \--insecure |python -m json.tool
Although the API should mostly stay the same, backward compatibility is not 100% guaranteed for the moment until the v1 API reaches full maturity.
10. Customizing PacketFence
10.1. Captive Portal
10.1.1. Presentation
XHTML Templates
Captive portal content uses Template Toolkit
templates. Default template files located in
/usr/local/pf/html/captive-portal/templates. Edit HTML code freely in these
files.
Each template relies on layout.html for the common top and bottom portions of
the page.
Internationalized AUP
For Acceptable Usage Policy translations in different captive portal languages, create specially named templates for different languages.
Example: browser locale es_ES uses template aup_text.es.html when detected.
Browser locale en_US uses template aup_text.en.html for English browsers.
The template aup_text.html is used as the final fallback for all locales.
Cannot use full locale in template name (aup_text.en_US.html); use only
two-letter prefix.
Logo
Customize captive portal logo: go to Configuration→Policies And Access
Control→Connection Profiles→default→Files. Upload logo at root of files.
After upload, go to Captive Portal section of connection profile and change
'Logo' field value to /profile-templates/default/filename-of-your-logo.png.
Alternative: delete existing logo.png, upload your logo and rename to
logo.png. This avoids altering 'Logo' value in connection profile.
You can also have a different logo per connection profile. In order to do so,
upload your logo in the appropriate connection profile, then edit it’s 'Logo'
value to be
/profile-templates/CONNECTION_PROFILE_ID/filename-of-your-logo.png.
For the best results, your logo size should be approximately 330x75 pixels.
CSS
The easiest way to customize CSS is to override default CSS using a <style>
tag inside layout.html.
<style> tag must be inserted just before <\head> in layout.html.
You also need to disable Content-Security-Policy (CSP) headers on captive portal (see instructions).
Workflow
When a HTTP request is received by the Apache web server, the following
workflow happens:
-
URL is compared against the redirection instructions in
/usr/local/pf/conf/httpd.conf.d/captive-portal-cleanurls.conf -
Requested CGI script in
/usr/local/pf/html/captive-portal/is executed -
CGI script calls a
generate_<type>which is defined in/usr/local/pf/lib/pf/web.pm -
The
generate_<type>function populate the proper template in/usr/local/pf/html/captive-portal/templatesin order to render the page
Remediation Pages
The remediation page shown to the user during isolation are specified through
the URL parameter of the given security event in
/usr/local/pf/conf/security_events.conf.
In its default configuration, PacketFence uses Template Toolkit to render text
provided in the directory /usr/local/pf/html/captive-portal/templates/security_events
and obeys to everything mentioned in the Presentation section.
Translations
The language of the user registration pages is selected through the
general.locale configuration parameter. Translatable strings are handled
differently for the Remediation pages and the rest of the captive portal:
-
Remediation pages
Strings defined in the security event pages (in
/usr/local/pf/html/captive-portal/templates/security_events) will be looked up in the translation files in/usr/local/pf/conf/locale/..and if a translation is available the translated string will be the one visible on the captive portal.Also, if you create a security event template with the name of your locale in
/usr/local/pf/html/captive-portal/templates/security_eventsin the format:<template_name>.<locale_name>.html. It will be loaded instead of the default<template_name>.htmland so you can put strings and HTML directly in your target language without the hassle of escaping everything properly as you would need to do withgettext.For example, if
malware.es_ES.htmlexists and you are using thees_ES(Spanish) locale then it will be loaded instead ofmalware.htmlon a security event set to load themalwaretemplate. -
Rest of the captive portal
In the templates, if a string is in a
i18n()call it will be translated. Alsopf::webtakes care of performing some of the other translations.
10.2. Adding custom fields to the database
You can, if needed, add additional fields to the PacketFence database. Keep in mind though that this might lead to more work when you upgrade to the next PacketFence version. Depending on the degree of integration of these fields with PacketFence, you’ll have to execute one or more of the following steps
10.2.1. Adding a field to the database only
In this case, the field is part of one of the main PacketFence tables, but PacketFence is unaware of it. PacketFence won’t consult the field and won’t be able to modify it. A possible usage scenario would be a 3rd party application which maintains this field.
Since PacketFence doesn’t have to know about the field, all you have to do is
execute your SQL ALTER
TABLE query and you are done.
10.2.2. Adding a field and giving PacketFence read-only access
In this case, PacketFence can show the contents of the table using both
pfcmd but won’t be able to modify the contents of the field.
Start by modifying the database table using an SQL ALTER TABLE query.
Then, modify the Perl module having the same name as the table you have added
the field to, i.e. If you
added the field to the node table, then edit /usr/local/pf/lib/pf/node.pm.
You’ll have to modify the
SQL SELECT queries at the beginning of the file to include your new field and,
possibly the functions
using these queries. If your new field should be used in reports, the dashboard
or graphs, you’ll also
have to modify the queries in /usr/local/pf/lib/pf/pfcmd/graph.pm,
/usr/local/pf/lib/pf/pfcmd/report.pm
and /usr/local/pf/lib/pf/pfcmd/dashboard.pm.
10.2.3. Adding a field and giving PacketFence read-write access
Start by creating the read-only field as described above.
Then, modify the SQL UPDATE and INSERT queries in the database tables'
Perl module, as well as the associated functions.
10.3. VLAN assignment
PacketFence uses the getRegisteredRole function defined in pf::role::custom
to determine a node’s VLAN. Here’s the default function:
sub getRegisteredRole {#$switch is the switch object (pf::Switch)#$ifIndex is the ifIndex of the computer connected to#$mac is the mac connected#$node_info is the node info hashref (result of pf::node's node_view on $mac)#$conn_type is set to the connection type expressed as the constant in pf::config#$user_name is set to the RADIUS User-Name attribute (802.1X Username or MAC address under MAC Authentication)#$ssid is the name of the SSID (Be careful: will be empty string if radius non-wireless and undef if not radius)my ($self, $switch, $ifIndex, $mac, $node_info, $connection_type, $user_name, $ssid) = @_;my $logger = Log::Log4perl->get_logger();return $switch->getVlanByName('normalVlan');}
As you can see, the function receives several parameters (such as the switch and full node details) which allow you to return the VLAN in a way that matches exactly your needs!
11. SNMP
11.1. Introduction
Good places to start reading about SNMP are https://en.wikipedia.org/wiki/SNMP and https://www.net-snmp.org/.
When working with SNMP, translating between OIDs and variable names becomes necessary sooner or later (in fact more sooner than later). When the OIDs are part of the Cisco MIBs, use the following tool to do the translation: http://tools.cisco.com/Support/SNMP/public.jsp. Otherwise, use snmptranslate for example and setup a collection of MIBs, provided (hopefully) by the manufacturer of the network equipment.
11.2. Obtaining switch and port information
Below are some example of how to obtain simple switch and port information using SNMP. These examples assume that the switch understands SNMP v2, has the read community public defined and is reachable at 192.168.1.10.
11.2.1. Switch Type
snmpwalk -v 2c -c public 192.168.1.10 sysDescr
11.2.2. Switchport indexes and descriptions
snmpwalk -v 2c -c public 192.168.1.10 ifDescr
11.2.3. Switchport types
snmpwalk -v 2c -c public 192.168.1.10 ifType
11.2.4. Switchport status
snmpwalk -v 2c -c public 192.168.1.10 ifAdminStatussnmpwalk -v 2c -c public 192.168.1.10 ifOperStatus
12. Supporting new network hardware
PacketFence supports new network hardware (Network Devices) through Perl objects
using extensive inheritance.
Add new product support by extending the pf::Switch class in
/usr/local/pf/lib/pf.
Start with vendor documentation when adding network device support. Determine exact switch capabilities and PacketFence compatibility. Identify device type: Switch, Access-Point or Wireless Controller.
12.1. Switch
Determine available capabilities: link change traps only? MAC notification traps? Port Security? MAC Authentication? 802.1X?
12.1.1. Link change capabilities
Define new class inheriting from pf::Switch with at least these functions:
-
getMacAddrVlan -
getVersion -
getVlan -
getVlans -
isDefinedVlan -
parseTrap -
_getMacAtIfIndex -
_setVlan
parseTrap function must return hash with keys trapType and trapIfIndex.
Values: up or down for trapType, trap’s ifIndex for trapIfIndex. See
similar switch implementation for inspiration. Recent modules typically better
coded than older ones.
12.1.2. MAC notification capabilities
In addition to the functions mentioned for link change, you need to define the following function:
-
isLearntTrapsEnabled
Also, your parseTrap function will need to return trapOperation, trapVlan
and trapMac keys in addition to trapType equals mac. See a similar
switch’s
implementation for inspiration. Usually recent modules are better coded than
older ones.
12.1.3. Port security capabilities
In addition to the functions mentioned for link change, you need to define the following functions:
-
isPortSecurityEnabled -
authorizeMAC
In this case, the parseTrap function needs to return secureMacAddrViolation
for the
trapType key. See a similar switch’s implementation for inspiration. Usually
recent modules are better coded than older ones.
12.1.4. MAC Authentication
NAS-Port translation
Often the ifIndex provided by the switch in a RADIUS Access-Request is
not the same as it’s real world physical equivalent. For example in Cisco
requests are in the 50xxx while physical ifIndex are 10xxx. In order for
PacketFence to properly shut the port or request re-authentication a
translation between the two is required. To do so provide an implementation
of the following interface:
-
NasPortToIfIndex
MAC Authentication re-evaluation
MAC Authentication re-evaluation is necessary in order to provoke a VLAN change
in the PacketFence
system. This happens for instance when a node is isolated based on an IDS event
or when the user
successfully authenticates through the captive portal. The default
implementation in
pf::Switch will bounce the port if there is no Voice over IP (VoIP) devices
connected to the
port. Otherwise it will do nothing and send an email. If your device has
specific needs (for example it
doesn’t support RADIUS Dynamic VLAN Assignments) override:
-
handleReAssignVlanTrapForWiredMacAuth
Please note that the default implementation works 99% of the time. If you are unsure whether to override, it means you don’t need to override.
Once the MAC Authentication works, add the Wired MAC Auth capability to the switch’s code with:
sub supportsWiredMacAuth { return $TRUE; }
12.1.5. 802.1X
NAS-Port translation
Often the ifIndex provided by the switch in a RADIUS Access-Request is
not the same as it’s real world physical equivalent. For example in Cisco
requests are in the 50xxx while physical ifIndex are 10xxx. In order for
PacketFence to properly shut the port or request re-authentication a
translation between the two is required. To do so provide an implementation
of the following interface:
-
NasPortToIfIndex
So far the implementation has been the same for MAC Authentication and 802.1X.
Force 802.1X re-authentication
802.1X re-authentication is necessary in order to provoke a VLAN change in the
PacketFence system.
This happens for instance when a node is isolated based on an IDS event or when
the user successfully
authenticates through the captive portal. The default implementation in
pf::Switch uses SNMP and the
standard IEEE8021-PAE-MIB and is generally well supported. If the default
implementation to
force 802.1X re-authentication doesn’t work override:
-
dot1xPortReauthenticate
Proper 802.1X implementations will perform re-authentication while still allowing traffic to go through for supplicants under re-evaluation.
Once the 802.1X works, add the Wired Dot1X capability to the switch’s code
with:
sub supportsWiredDot1x { return $TRUE; }
12.1.6. RADIUS Dynamic Authorization (RFC3576)
RADIUS Dynamic Authorization also known as RADIUS Change of Authorization (CoA) or RADIUS Disconnect Messages is supported by PacketFence starting with version 3.1.
On wired network devices CoA can be used to change the security posture of a MAC
and perform other
functions like bounce a port. So far we only encountered support for CoA on the
wired side on the Cisco
hardware. For an implementation example check _radiusBounceMac in
pf::Switch::Cisco.
12.1.7. Floating Network Devices Support
Floating Network Devices are described in the Administration Guide under "Floating Network Devices" in the "Optional Components" section. Refer to this documentation if you don’t know what Floating Network Devices are.
In order to support Floating Network Devices on a switch, you need to implement the following methods:
-
setPortSecurityEnableByIfIndex($ifIndex, $enable) -
isTrunkPort($ifIndex) -
setModeTrunk($ifIndex, $enable) -
setTaggedVlans($ifIndex, $switch_locker_ref, @vlans) -
removeAllTaggedVlans($ifIndex, $switch_locker_ref)
You might need to implement the following:
-
enablePortConfigAsTrunk($mac, $switch_port, $switch_locker, $taggedVlans)Provided by
pf::Switchcore as the glue betweensetModeTrunk(),setTaggedVlans()andremoveAllTaggedVlans(). Override if necessary.
-
disablePortConfigAsTrunk($switch_port)Provided by
pf::Switchcore as the glue betweensetModeTrunk(),setTaggedVlans()andremoveAllTaggedVlans(). Override if necessary.
-
enablePortSecurityByIfIndex($ifIndex)Provided by
pf::Switchcore as a slim accessor tosetPortSecurityEnableByIfIndex(). Override if necessary.
-
disablePortSecurityByIfIndex($ifIndex)Provided by
pf::Switchcore as a slim accessor tosetPortSecurityEnableByIfIndex(). Override if necessary.
-
enableIfLinkUpDownTraps($ifIndex)Provided by
pf::Switchcore as a slim accessor tosetIfLinkUpDownTrapEnable. Override if necessary.
-
disableIfLinkUpDownTraps($ifIndex)Provided by
pf::Switchcore as a slim accessor tosetIfLinkUpDownTrapEnable. Override if necessary.
Once all the required methods are implemented, enable the capability in the switch’s code with:
sub supportsFloatingDevice { return $TRUE; }
12.2. Wireless Access-Points or Controllers
12.2.1. Minimum hardware requirements
PacketFence’s minimum requirements regarding Wireless hardware is:
- definition of several SSID with several VLANs inside every SSID (minimum of 2 VLANs per SSID)
- RADIUS authentication (MAC Authentication / 802.1X)
- Dynamic VLAN assignment through RADIUS attributes
- a means to de-associate or de-authenticate a client through CLI (Telnet or SSH), SNMP, RADIUS Dyn-Auth [3] or WebServices
Most of these features are available on enterprise grade Access Points (AP) or Controllers. Where the situation starts to vary wildly is for deauthentication support.
12.2.2. De-authentication techniques
CLI (SSH or Telnet)
An error prone interface and requires preparation for the SSH access or is insecure for Telnet. Not recommended if you can avoid it.
SNMP
SNMP de-authentication works well when available. However Vendor support is not consistent and the OID to use are not standard.
RADIUS Dynamic Authorization (RFC3576)
RADIUS Dynamic Authorization also known as RADIUS Change of Authorization (CoA) or RADIUS Disconnect Messages is supported by PacketFence starting with version 3.1. When supported it is the preferred technique to perform de-authentication. It is standard and requires less configuration from the user.
An actual implementation can be found in pf::Switch::Aruba.
12.2.3. Template module
Start with a copy of the template module
pf/lib/pf/Switch/WirelessModuleTemplate.pm
and fill in appropriate documentation and code.
12.2.4. Required methods
You need to implement at least:
getVersion()-
Fetches firmware version
parseTrap()-
Parses the SNMP Traps sent by the hardware. For wireless hardware an empty method like the one in
pf::Switch::WirelessModuleTemplateis ok. deauthenticateMac()-
Performs deauthentication
supportsWirelessMacAuth()-
Return
$TRUEif MAC-Authentication is supported supportsWirelessDot1x()-
Return
$TRUEif 802.1X (aka WPA-Enterprise) is supported
12.2.5. Override methods
If default implementation of the following methods doesn’t work you will need to override them:
extractSsid()-
Extract SSID from RADIUS Request
12.2.6. Special case: bridged versus tunneled modes and deauthentication
It is important to validate the Access-Point (AP) to Controller relationship
when operating in bridged
mode versus when operating in tunneled mode. For example, some hardware will
send the RADIUS Access-Request
from the AP when in bridged mode even though it is controlled by a controller.
This behavior impacts
deauthentication because it still needs to be performed on the controller. To
support this behavior a
switches.conf parameter was introduced: controller_ip.
When adding a new Wireless module try to validate the bridged versus tunneled
behavior and modify
deauthenticateMac() to honor controller_ip if required.
12.3. The "adding a new network device module in PacketFence" checklist
Here’s a quick rundown of the several files you need to edit in order to add a new switch into PacketFence. There’s a plan to reduce this amount of work in progress see issue #1085.
- Tested model and firmware version should be documented in module’s POD
- Any bugs and limitations should be documented in module’s POD
- Make sure that all tests pass
- Add configuration documentation to the Network Devices Guide
- Add switch to the Network Devices Guide’s switch chart
-
Add switch to the chart in
README.network-devices
13. PacketFence builds
13.1. Packer
To build PacketFence, we use Packer to create container images that are then used in a GitLab pipeline.
13.2. Anatomy of Packer template
PacketFence rely on
gitlab-buildpkg images to run GitLab pipeline with
gitlab-buildpkg-tools.
Packer
template (pfbuild.json) use these images as base to build
inverse-inc container images.
13.2.1. Custom build dependencies
To start building PacketFence, we need to install specific things in images like:
- custom repositories and GPG keys to install RPM or DEB packages at build time
- install and configure upstream softwares necessary to build PacketFence if we can’t use packages
We use Ansible and shell scripts to cover these steps. It’s possible because Python is already installed in gitlab-buildpkg images.
13.2.2. Build dependencies in packages specs
Build dependencies need to be install in container images before starting build
process. We rely on gitlab-buildpkg-tools to automatically install
those dependencies based on packages specifications file. Consequently, all
build requires need to be define in packages specifications file.
13.2.3. Golang environment
We use Packer to set up a Golang environment in order to build Golang binaries in container images.
We also set environment variables in container images, using ENV directives,
to simplify usage of go commands.
13.2.4. Clean up
To make container images lightweight, we make a clean up at end of the process.
13.3. How to build container images ?
Container images are built inside a GitLab pipeline.
13.3.2. Makefile
Because we run build inside a GitLab pipeline, many environment variables can
be set to change build behavior. A Makefile and a wrapper are
provided to
simplify creation of a new container images based on environment variables.
DOCKER_TAGS=feature-pfconfig-container \REGISTRY_USER=InverseBot REGISTRY_PASSWORD=REDACTED \REGISTRY=ghcr.io REGISTRY_URL=${REGISTRY}/inverse-inc/packetfence \make -e -C ci/packer build_img_docker_pfbuild
13.4. Troubleshooting
You can troubleshoot issues in Packer builds by setting environment variable $PACKER_LOG environment variable to 1.
14. Developer recipes
14.1. Virtual environment
To test PacketFence on several distributions, we used Vagrant virtual machines. You can set up a similar environment to develop.
14.1.1. Virtual environment: prerequisites
Install following softwares:
- Vagrant (>= 2.2.10) provided by Hashicorp
- libvirt, KVM/QEMU and vagrant-libvirt if you want to use libvirt as a provider for Vagrant
-
pywinrm > 0.3 if you want to use
advirtual machine - Ansible = 2.10.X
14.1.2. Virtual environment: initial setup
Install Ansible and Ansible code
yum install -y python3-pip
apt updateapt install -y python3-pip
Then install Ansible through pip:
pip3 install --user 'ansible<3'
After installing Ansible through pip, you need to add $HOME/.local/bin/ to your PATH.
Using ansible-galaxy command, you can then pull PacketFence’s collection and Ansible roles:
cd packetfence/addons/vagrantansible-galaxy install -r requirements.yml
14.2. Running development version
14.2.1. Bleeding edge
For day to day development one can run a checkout of the current development branch in
/usr/local/pf/ and develop there within a working setup.
14.2.2. Not so bleeding edge
If you prefer to use packages, you can install latest PacketFence packages from nightly builds.
Initial setup
Install prequisites and follow
initial setup then start pf*dev
machines.
These machines will be auto-configured to install nightly builds from development repositories.
Packages from PPA
If you want to install latest packages built in the pipeline, available on GitLab, you can use following commands:
CI_PROJECT_NAME="ppa" CI_PAGES_URL="http://inverse-inc.gitlab.io/packetfence"vagrant up VM_NAME
Day to day usage
To keep your machine up-to-date, you can run the following commands:
vagrant provision --provision-with=install VM_NAME
Make sure you read the Upgrade Guide after every upgrades to avoid any surprises.
Running an Ansible playbook against Vagrant virtual machines
If you want to use Ansible directly against Vagrant virtual machines (already started), you can use following commands:
ansible-playbook site.yml --limit VM_NAME
It’s possible because we use a static Ansible inventory. This inventory is also used by Vagrant to start virtual machines.
Specific version of a package
If you want to install a specific version of a package, you can create a YAML file that override default inventory, for example:
cat >> extra.yml << EOFpacketfence_install__centos_packages:- packetfence-9.2-20191126180126.98740132.0007.el7EOFansible-playbook site.yml --limit VM_NAME -e @extra.yml
15. Containers recipes
15.1. Glossary
- A server running the packages: A PacketFence server installed using the RPM or DEB packages and not converted to a dev machine (i.e. what PacketFence users deploy)
15.2. Applying a custom patch on a server running the packages
When applying a custom patch or adding debug in the code on a PacketFence 12.0+ server, additional steps must be taking for your change to be effective in the service(s) running in container mode.
To know if a service runs in container mode, run systemctl status on the
service (ex: systemctl status packetfence-pfpki) and check if one of the child
processes contains docker run.
After you’ve altered the code on the server and you’re satisfied with the changes, run the following command:
# (pfpki is being used in this example, replace with the appropriate containername)/usr/local/pf/addons/dev-helpers/build-local-container.sh pfpki
Make sure the build succeeds and then restart the service using systemctl restart [service-name] to make your change active.
15.3. Altering the code in a container on a server running the packages
If you alter the code in a running container, your change will be lost the next time the container restarts. In order to make your change permanent, run:
# (pfpki is being used in this example, replace with the appropriate containername)/usr/local/pf/addons/dev-helpers/commit-local-container.sh pfpki
16. Running tests
16.1. Unit tests
16.1.1. Unit tests: prerequisites
- MariaDB up and running
-
PacketFence package(s) installed with all dependencies in
/usr/local/pfdirectory - Fingerbank API key configured
-
Environment variables defined:
-
PF_TEST_MGMT_INT -
PF_TEST_MGMT_IP -
PF_TEST_MGMT_MASK
-
- Golang environment
You can meet these prerequisites by starting a pf*dev Vagrant virtual
machine using instructions in Virtual environment: initial setup section.
Inside pf*dev virtual machines, t directory will be available
under /usr/local/pf/t.
16.1.2. Running all unit tests
After a vagrant up command, unit tests should have been run. If you
want to run them again, execute following command:
vagrant provision --provision-with=run-unit-tests VM_NAME
This will upload run-tests.sh script on virtual machine to
run it.
vagrant rsync VM_NAME before running unit
tests again if you modify t directory on your host. This will upload latest
changes made to /src/t directory in VM_NAME.16.1.3. Running Perl unit tests
If you want to run only Perl unit tests, disable Golang unit tests using
GOLANG_UNIT_TESTS environment variable:
GOLANG_UNIT_TESTS=no vagrant provision --provision-with=run-unit-tests VM_NAME
16.1.4. Running Golang unit tests
If you want to run only Golang unit tests, disable Perl unit tests using
PERL_UNIT_TESTS environment variable:
PERL_UNIT_TESTS=no vagrant provision --provision-with=run-unit-tests VM_NAME
You can get more details on Golang unit tests in Golang section.
16.1.5. Wrapper
In ci/lib/test, you will find a Makefile used as a
wrapper to start, test and destroy virtual machines. Examples:
make -C ci/lib/test test-pfcen7dev-devmake -e -C ci/lib/test test-pfcen7dev-devmake PF_VM_NAME=pfdeb9dev PERL_UNIT_TESTS=no -C ci/lib/test testmake PF_VM_NAME=pfdeb9dev clean
16.2. Integration tests
The aim of integration tests is to test common PacketFence scenarios and integrations in a pipeline.
Integration tests rely on:
- Virtual environment
-
network topologies built using
libvirt[4] - virtual machines different than PacketFence to test integrations
16.2.1. Network subnets and IP addresses
Network name |
Subnet |
VLAN ID |
Management |
172.17.17.0/24 |
17 |
Registration |
172.17.2.0/24 |
2 |
Isolation |
172.17.3.0/24 |
3 |
Inline L2 |
172.17.6.0/24 |
6 |
Inline L3 |
172.17.18.0/24 |
18 |
Internet |
192.168.121.0/24 |
100 |
Management network is used to provision each virtual machine using Ansible to put them in a desired state.
Virtual machine |
Network name |
IP address |
pfel8dev |
Management |
172.17.17.10 |
pfel8stable |
Management |
172.17.17.14 |
pfdeb12dev |
Management |
172.17.17.12 |
pfdeb12stable |
Management |
172.17.17.16 |
ad |
Management |
172.17.17.100 |
linux01 |
Management |
172.17.17.101 |
linux02 |
Management |
172.17.17.102 |
switch01 |
Management |
172.17.17.201 |
wireless01 |
Management |
172.17.17.210 |
node01 |
Management |
172.17.17.251 |
node02 |
Management |
172.17.17.252 |
pf*dev or pf*stable |
Registration |
172.17.2.2 |
pf*dev or pf*stable |
Isolation |
172.17.3.2 |
pf*dev or pf*stable |
Inline L2 |
172.17.6.2 |
switch01 |
Inline L2 |
172.17.6.3 |
switch01 |
Inline L3 |
172.17.18.254 |
libvirt hypervisor.16.2.2. Wired network topology
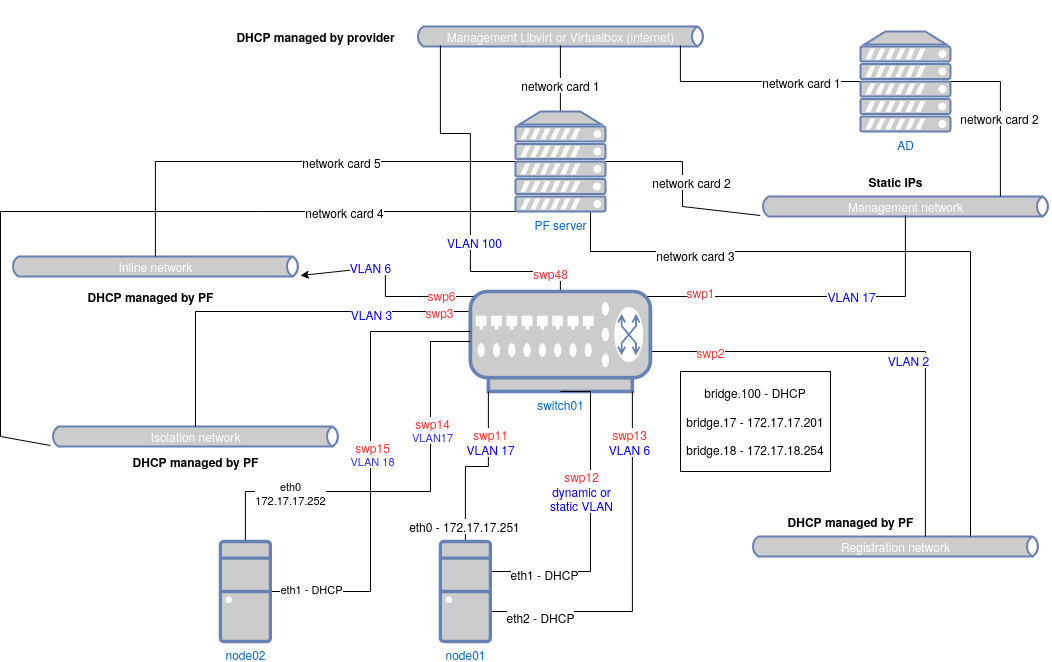
Initial Provisioning
switch01, node01 and node02 are provisioned using Vagrant like this:
- a first boot with basic shell provisioning to configure interfaces remap and networks
- a second boot that handles interface remap
- an Ansible provisioning
Provisioning is deliberately minimalist to make the most during integration tests.
Inventory Information
| Virtual machine | Interfaces | MAC address |
|---|---|---|
switch01 |
swp48, bridge, bridge.6, bridge.17, bridge.18, bridge.100 |
Same MAC, automatically generated |
switch01 |
swp1 |
a0:00:00:00:00:01 |
switch01 |
swp2 |
44:38:39:00:00:02 |
switch01 |
swp3 |
44:38:39:00:00:03 |
switch01 |
swp6 |
44:38:39:00:00:06 |
switch01 |
swp11 |
44:38:39:00:00:11 |
switch01 |
swp12 |
44:38:39:00:00:12 |
switch01 |
swp13 |
44:38:39:00:00:13 |
switch01 |
swp14 |
44:38:39:00:00:14 |
switch01 |
swp15 |
44:38:39:00:00:15 |
node01 |
eth0 |
a0:00:00:00:00:12 |
node01 |
eth1 |
00:03:00:11:11:01 |
node01 |
eth2 |
00:03:00:11:11:02 |
node02 |
eth0 |
a0:00:00:00:00:22 |
node02 |
eth1 |
00:03:00:11:12:01 |
16.2.3. Wireless network topology
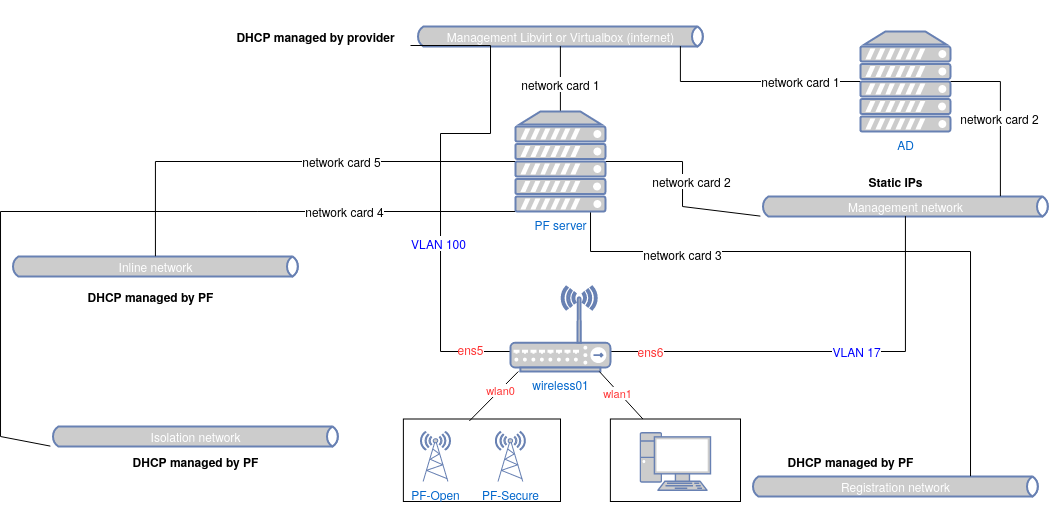
Inventory Information
| Virtual machine | Interfaces | MAC address |
|---|---|---|
wireless01 |
wlan0 ( hostapd managed interface) |
02:00:00:00:00:00 |
wireless01 |
wlan0.XXX (with XXX VLAN returned by PacketFence in RADIUS reply) |
02:00:00:00:00:00 |
wireless01 |
wlan1 ( wpa_supplicant interface) |
02:00:00:00:01:00 |
On wireless01:
-
wlan0is the interface which represents an access point (NAS for PacketFence) -
wlan1is the interface which represents a supplicant (node for PacketFence)
16.2.4. Virtual machines
Active Directory Server
Virtual machine called ad will be auto-provisioned with:
- a DNS domain
- an Active Directory domain
- Active Directory Certificate Services (AD CS) with auto-enrollment using a GPO
-
a
administratoraccount, member of Domain admins group, withVagrantPass1as password -
a
packetfenceaccount, member of Domain users group, withP@ck3tF3nc3passas password
Several reboots are necessary before machine can be provisioned by Ansible. During initial Ansible provisioning, several reboots will occur too. It takes like few minutes to have a machine up and running.
You can find credentials of AD accounts (domain administrator and PacketFence user) in following files:
-
$PF_ROOT/addons/vagrant/inventory/group_vars/linux_servers/samba4ad.yml
Switch01
switch01 is a virtual switch that uses
Cumulus Linux 3.7 system.
This switch is configured using a VLAN aware-bridge to manage VLAN on interfaces (recommended approach)
hostapd is the daemon responsible to send 802.1X and MAC Authentication
requests to RADIUS server (as described in
802.1X Cumulus Linux documentation). We configured this daemon using Ansible with
RADIUS server informations.
However, daemon will be started during integration tests when switch interfaces
are involved.
Node01 and Node02
node01 is a Debian Buster virtual machine used as node to test wired
PacketFence
features like 802.1X, MAC authentification, registration, isolation and inline
scenarios.
node02 is identical to node01 but is only used to test inline L3 features of
PacketFence.
These machines have an Internet access only during its first boot to emulate a
node connected to a switch controlled by PacketFence. After the reboot, machines
are only
reachable using management network: vagrant ssh node01 will not work.
All interfaces of node01 and node02 are up after initial provisionning. We
rely on
switch01 configuration to trigger specific scenario.
Because node01 and node02 have no IP on management network during first
boot, Ansible
provisioning through Vagrant is specific and made in two steps:
- pre-provisioning using dynamic inventory generated by Vagrant and a specific playbook
- post-provisioning identical to other Vagrant VMs (but without any Internet access)
Pre-provisioning playbooks should be used to install everything that require an Internet access.
Pre-provisioning step will not use variables defined in common Ansible inventory: variables need to be defined directly in playbooks that run during this step. Variables defined in common Ansible inventory and in playbooks need to be consistent to avoid an override during post-provisioning.
Wireless01
wireless01 is a Debian Buster virtual machine used as a virtual switch and
node.
It is used to test Wireless PacketFence features like 802.1X, MAC
authentification.
hostapd is the daemon responsible to send 802.1X and MAC Authentication
requests to RADIUS server. It is using the kernel module mac80211_hwsim, a
software simulator of 802.11 radio(s) for mac80211 (as described in
Linux Wireless mac80211_hwsim).
We configured this daemon using Ansible with RADIUS server informations.
Two deamons are available. One for an Open SSID and the other for a Secure SSID. Both are set to not run at the same time.
wpa_supplicant utility is an implementation of the WPA Supplicant
component with support for WPA and WPA2 (IEEE 802.11i / RSN). Supplicant is the
IEEE 802.1X/WPA Supplicant for wireless network devices. It implements key
negotiation
with a WPA Authenticator which controls the roaming and IEEE 802.11
authentication/association of the wlan driver.
Linux servers
Linux servers are used to:
- provide infrastructure services to PacketFence server(s)
- host services to test integration with PacketFence
They are provisioned using Ansible.
17. Contributing
PacketFence contribution guidelines:
- Be active on the developer mailing list
Join our developers mailing list for PacketFence contributions: https://lists.sourceforge.net/lists/listinfo/packetfence-devel. Share your issues, work, and solutions. Active collaboration increases chances of timely work incorporation.
- Use the issue tracker: https://packetfence.org/bugs/
Check existing tickets - your bug/feature may be filed already with helpful information.
- Please provide small, focused and manageable patches or pull-requests
For extensive coding: use git and track stable branch. Develop features in
small chunks while staying in touch. This enables quick merging; avoid large
code dumps.
17.1. Creating patches
Patches should be sent in unified diff format. This can be obtained from the
diff or git tools.
diff -u oldfile newfile
or from a checkout of the PacketFence source code from git:
git diff
17.2. Translations
The internationalization process uses gettext. If you are new to gettext,
please consult
https://www.gnu.org/software/gettext/manual/gettext.html#Overview for a quick introduction.
The PO files are stored in /usr/local/pf/conf/locale. List that directory to
see the languages
we currently have translations for.
17.2.1. Online using Transifex
We use the hosted service Transifex to translate PacketFence’s PO files. It offers the possibility to translate all the strings online as well as providing a command-line tool to push your changes. It’s very convenient.
To use Transifex, you must first sign up for a free account here: https://www.transifex.net/plans/signup/free/
- Once registered, request a new team for your language
- Once authorized, you’ll be able to start/continue translating PacketFence in your language
If you need further help about using Transifex, you might want to have a look here.
17.2.2. Using traditional method
If you want to add support for a new language, please follow these steps:
-
create a new language subdirectory in
/usr/local/pf/conf/locale -
change into your newly created directory
-
create a new subdirectory
LC_MESSAGES -
change into your newly created directory
-
copy the file
/usr/local/pf/conf/locale/en/LC_MESSAGES/packetfence.pointo your directory -
translate the message strings in
packetfence.po -
create the MO file by executing:
/usr/bin/msgfmt packetfence.po
Submit your new translation to the PacketFence project by contacting us at packetfence-devel@lists.sourceforge.net.
18. Commercial Support and Contact Information
For any questions or comments, do not hesitate to contact us by writing an email to: support@inverse.ca.
Akamai - Inverse team (https://www.packetfence.com) offers professional services around PacketFence to help organizations deploy the solution, customize, migrate versions or from another system, performance tuning or aligning with best practices.
Hourly rates or support packages are offered to best suit your needs.
Please visit https://www.packetfence.com for details.
19. GNU Free Documentation License
Please refer to https://www.gnu.org/licenses/fdl-1.2.txt for the full license.