Copyright © 2026 Akamai Technologies Canada Inc.
Permission is granted to copy, distribute and/or modify this document under the terms of the GNU Free Documentation License, Version 1.2 or any later version published by the Free Software Foundation; with no Invariant Sections, no Front-Cover Texts, and no Back-Cover Texts. A copy of the license is included in the section entitled "GNU Free Documentation License".
The fonts used in this guide are licensed under the SIL Open Font License, Version 1.1. This license is available with a FAQ at: http://scripts.sil.org/OFL
Copyright © Raph Levien, http://levien.com/, with Reserved Font Name: "Inconsolata".
1. About this Guide
This guide provides installation and configuration steps for active/active clustering in PacketFence 7+. It covers HAProxy load balancing, Keepalived for high availability, Galera database clustering, and layer-3 cluster configurations. The guide includes essential troubleshooting procedures for cluster synchronization issues and performance optimization. For advanced HAProxy and Keepalived features beyond PacketFence integration, consult their respective documentation.
Find the latest version at https://www.packetfence.com/docs/
1.1. Other Guides
- Developer’s Guide
-
Technical documentation for customizing PacketFence including REST API usage, captive portal theming and functionality modifications, SNMP module development, supporting new network equipment, and application code customizations. Essential for integrators and developers extending PacketFence.
- Installation Guide
-
Complete installation and configuration guide covering standalone deployments, system requirements, network planning, authentication integration (Active Directory, LDAP, RADIUS), certificate management, and initial system setup. Includes troubleshooting and advanced configuration topics.
- Network Devices Configuration Guide
-
Device-specific configuration instructions for over 80 supported network vendors including switches (802.1X, MAC authentication, VLAN assignment), wireless controllers and access points. Covers RADIUS, SNMP configuration and integration with various network equipment manufacturers.
- Upgrade Guide
-
Step-by-step upgrade procedures with version-specific compatibility changes, manual configuration migration steps, database schema updates, and critical upgrade notes. Includes troubleshooting for common upgrade issues and rollback procedures.
1.2. Other sources of information
- https://www.packetfence.com/news
-
Release announcements with detailed feature descriptions, performance improvements, security updates, and comprehensive bug fix listings organized by PacketFence version.
- PacketFence Users Mailing List
-
Community support forum for installation help, configuration questions, troubleshooting assistance, and best practices discussions. Active community of users and developers providing peer-to-peer support.
- PacketFence Announcements
-
Public announcements including new releases, security warnings and important updates regarding PacketFence. Low-traffic list for staying informed about major PacketFence developments.
- PacketFence Development
-
Discussion of PacketFence development including feature requests, architectural discussions, patch submissions and development coordination. For developers contributing to PacketFence core.
Package and release tarballs include the PacketFence guide files.
2. Assumptions
- At least three installed PacketFence (v7+) servers
- Servers run RHEL 8 or Debian 12
- Servers have identical network interface identifiers (e.g. eth0) (see next section)
- Servers have IPv6 disabled (see next section)
- Servers have fully qualified domain names (FQDN)
-
Servers meet latency limits (Galera cluster requirement):
- Smaller deployments: 75ms maximum latency between nodes
- Larger deployments: 50ms maximum latency between nodes
3. Cluster Setup
3.1. Setup on all servers
Run these actions on all cluster members.
3.1.1. Interfaces names
Ensure interface names are identical on all servers. Use these guides for predictable network interface names:
3.1.2. sysctl.conf
Configure each server to allow services to bind on IP addresses not currently configured. This enables faster service failover.
Disable IPv6.
On all the servers, add following lines in /etc/sysctl.conf:
net.ipv4.ip_nonlocal_bind = 1net.ipv6.conf.all.disable_ipv6 = 1
and run:
sysctl -preboot
inet_protocols = ipv4 in /etc/postfix/main.cf to be able to use
it.3.1.3. Installation of PacketFence
Before starting cluster setup, you need to install PacketFence on each cluster member by following instructions in PacketFence Installation Guide.
3.1.4. Install the database replication tools
First, you will need to install, on each servers, Mariabackup for the synchronization to work correctly.
yum install MariaDB-backup socat --enablerepo=packetfence
apt-get install lsb-release wget gnupg2 ; \apt-get update ; \apt-get -y install mariadb-backup
For the next steps, you want to make sure that you didn’t configure anything
in /usr/local/pf/conf/cluster.conf. If you already did, comment
all the
configuration in the file and do a configreload
(/usr/local/pf/bin/pfcmd configreload hard).
3.2. Setup on the first server of the cluster
First, on the first server, ensure packetfence-mariadb is running and
make sure it was able to start in 'standalone' mode.
systemctl status
packetfence-mariadb
Then, you will need to create a user for the database replication that PacketFence will use. You can use any username/password combination. After creating the user, keep its information close-by for usage in the configuration.
mysql -u rootCREATE USER 'pfcluster'@'%' IDENTIFIED BY 'aMuchMoreSecurePassword';GRANT PROCESS, RELOAD, LOCK TABLES, REPLICATION CLIENT, SUPER ON *.* TO'pfcluster'@'%';CREATE USER 'pfcluster'@'localhost' IDENTIFIED BY 'aMuchMoreSecurePassword';GRANT PROCESS, RELOAD, LOCK TABLES, REPLICATION CLIENT, SUPER ON *.* TO'pfcluster'@'localhost';FLUSH PRIVILEGES;
3.3. Basic PacketFence configuration
3.3.1. First server
Now, on the first server of the cluster, go through the configurator, until last step. The services should be left stopped at the end of the configurator.
If the configurator fails or cluster setup encounters issues, see Service Startup Failures and Checking the MariaDB sync in the Troubleshooting section.
Then restart PacketFence’s mariadb on the first server:
systemctl restart packetfence-mariadb
3.3.2. Other servers (optional)
On the other servers of the cluster, configure only the network interfaces (step 1) without going past that section in the configurator. If the other servers already have the right IP addresses configured on their interfaces, you can ignore this step.
This step is only necessary to configure IP addresses on interfaces (at OS level). PacketFence configuration of interfaces will be done later.
3.3.3. Current state
At this point, for a VLAN enforcement configuration for example, the network interfaces of the servers must be configured, and must be able to see, for each server:
In /etc/sysconfig/network-scripts/ |
|
One Management Interface |
ifcfg-YourFirstInterfaceName |
One Secondary Interface |
ifcfg-YourSecondInterfaceName |
One Registration Interface |
ifcfg-YourSecondInterfaceName.YourRegistrationVLANID |
One Isolation Interface |
ifcfg-YourSecondInterfaceName.YourIsolationVLANID |
3.4. Create the new cluster
3.4.1. PacketFence Configuration Modification (first server only)
In order for PacketFence to communicate properly with the MariaDB cluster, change the following. This change only needs to be done on the first server of the cluster. It will be synchronized later.
Add the following to the bottom of /usr/local/pf/conf/pf.conf :
[database]host=100.64.0.1port=6033[active_active]# Change these 2 values by the credentials you've set when configuring MariaDB abovegalera_replication_username=pfclustergalera_replication_password=aMuchMoreSecurePassword[webservices]# Change these 2 values by the credentials you wantuser=packetpass=anotherMoreSecurePassword[advanced]configurator=disabled[services]galera-autofix=disabled
Then, add the following to the bottom of
/usr/local/pf/conf/pfconfig.conf :
[mysql]host=100.64.0.1port=6033
Now, restart packetfence-config and reload the configuration. You will see
errors related to a cache write issue but you can safely ignore it for now.
These appear because packetfence-config cannot connect to the database yet.
If database connectivity issues persist beyond expected, see Database Connectivity Issues and Checking the MariaDB sync in the Troubleshooting section.
systemctl restart packetfence-config/usr/local/pf/bin/pfcmd configreload hard
3.4.2. Configure cluster.conf (first server only)
In order to create a new cluster, configure
/usr/local/pf/conf/cluster.conf on the first server of the
cluster.
Configure it with the server hostname. Use : hostname command
(without any arguments) to get it.
In the case of this example it will be pf1.example.com.
The CLUSTER section represents the virtual IP addresses of the cluster that
will be shared by the servers.
In this example, eth0 is the management interface, eth1.2 is the registration interface and eth1.3 is the isolation interface.
Create a configuration similar to this :
[CLUSTER]management_ip=192.168.1.10[CLUSTER interface eth0]ip=192.168.1.10[CLUSTER interface eth1.2]ip=192.168.2.10[CLUSTER interface eth1.3]ip=192.168.3.10[pf1.example.com]management_ip=192.168.1.5[pf1.example.com interface eth0]ip=192.168.1.5[pf1.example.com interface eth1.2]ip=192.168.2.5[pf1.example.com interface eth1.3]ip=192.168.3.5[pf2.example.com]management_ip=192.168.1.6[pf2.example.com interface eth0]ip=192.168.1.6[pf2.example.com interface eth1.2]ip=192.168.2.6[pf2.example.com interface eth1.3]ip=192.168.3.6[pf3.example.com]management_ip=192.168.1.7[pf3.example.com interface eth0]ip=192.168.1.7[pf3.example.com interface eth1.2]ip=192.168.2.7[pf3.example.com interface eth1.3]ip=192.168.3.7
Once this configuration is done, reload the configuration and perform a checkup:
/usr/local/pf/bin/pfcmd configreload hard/usr/local/pf/bin/pfcmd checkup
The reload and the checkup will complain about the unavailability of the database, which you can safely ignore for now. Most important is that you don’t see any cluster configuration related errors during the checkup.
3.4.3. Database setup
Second and third servers
Make sure you stopped MariaDB on the two others servers:
systemctl stop packetfence-mariadb
First server
Start MariaDB forcing it to create a new cluster using configuration defined
in /usr/local/pf/conf/cluster.conf:
systemctl stop packetfence-mariadb/usr/local/pf/bin/pfcmd generatemariadbconfigsystemctl set-environment MARIADB_ARGS=--force-new-clustersystemctl start packetfence-mariadb
Then, restart PacketFence to apply all the changes:
/usr/local/pf/bin/pfcmd service pf restart
Expected state on first server
If no error is found in the previous configuration, the previous restart of
PacketFence should have started: keepalived and radiusd-loadbalancer along
with the other services. If a mail server has been set up on the first
server, you should have receive a mail from keepalived to inform you that
the first server got Virtual IP (VIP) adresses.
You should now have service using the first server on the IP addresses
defined in the CLUSTER sections.
/usr/local/pf/bin/pfcmd service pf statusip -br a, on the first server, you need
to find the VIP on the first ethernet interface. On the others server, be
sure to have the interface.VLANID interfaces with the good IPs.3.4.4. Enable PacketFence clustering services at boot (all servers)
Make sure the PacketFence clustering services will be started at boot by running the following command on all of the servers:
systemctl set-default packetfence-cluster
3.5. Integrating the two other nodes
/usr/local/pf/bin/pfcmd service pf stop)
and restart the steps from here.packetfence-mariadb (systemctl stop packetfence-mariadb) and start it
with the new cluster option so the servers can join (systemctl
set-environment MARIADB_ARGS=--force-new-cluster && systemctl restart
packetfence-mariadb)Now, the two other nodes will need to be integrated in the cluster.
3.5.1. Stop iptables (all servers)
On all your servers, make sure that packetfence-iptables is stopped:
systemctl stop packetfence-iptables
3.5.2. Sync the PacketFence configuration across the cluster (second and third
servers)
Do (and make sure it completes without any errors):
/usr/local/pf/bin/cluster/sync --from=192.168.1.5 --api-user=packet --api-password=anotherMoreSecurePassword
Where :
- '192.168.1.5' is the management IP of the first server node
- 'packet' is the webservices username you have configured on the first server node during PacketFence Configuration Modification (first server only)
- 'anotherMoreSecurePassword' is the webservices password you have configured on the first server node during PacketFence Configuration Modification (first server only)
Then, reload the configuration and start the webservices on second and third servers:
systemctl restart packetfence-config/usr/local/pf/bin/pfcmd configreload/usr/local/pf/bin/pfcmd service proxysql restart/usr/local/pf/bin/pfcmd service httpd.webservices restart
3.5.3. MariaDB sync (second and third servers)
Ensure packetfence-mariadb is still stopped on the two servers that will
be joined:
systemctl stop packetfence-mariadb
Now, flush any MariaDB data you have on the two servers and restart
packetfence-mariadb so that the servers join the cluster.
rm -fr /var/lib/mysql/*systemctl restart packetfence-mariadb
If you see following message when running systemctl status
packetfence-mariadb, your nodes have successfully joined cluster:
INFO: Successful clustered connection to the DB
To be sure your cluster is correctly setup, take a look at Checking the MariaDB sync section.
In case you have some issues, ensure your MariaDB instance running with
--force-new-cluster is still running on the first server, if its not, start
it again.
3.5.4. Starting the first server normally
Once all servers are synced, go on the first server that should still be
running with the --force-new-cluster option and run:
systemctl stop packetfence-mariadbsystemctl unset-environment MARIADB_ARGSsystemctl start packetfence-mariadb
Now, restart packetfence-iptables:
systemctl restart packetfence-iptables
Enabling galera-autofix service (first server)
Before starting services on all servers, galera-autofix service need to be
re-enabled and configuration synced across cluster:
curl -X PATCH -d '{"galera-autofix":"enabled"}' localhost:22224/api/v1/config/base/services ; echo
3.5.5. Wrapping up
Now restart PacketFence on all servers:
/usr/local/pf/bin/pfcmd service pf updatesystemd/usr/local/pf/bin/pfcmd service pf restart
You should now reboot each server one by one waiting for the one you rebooted to come back online before proceeding to the next one:
reboot
After each reboot, ensure the database sync is fine by performing the checks outlined in Checking the MariaDB sync section.
3.6. Additional steps
3.6.1. Securing the cluster: Keepalived secret
From the admin interface (using virtual IP address of
your cluster), go to Configuration → System Configuration → Cluster and
change the Shared KEY.
Make sure you restart keepalived on all your
servers using:
/usr/local/pf/bin/pfcmd service keepalived restart
If you already use VRRP protocol on your network, you can also change the
default Virtual Router ID and enable VRRP Unicast.
3.6.2. Domain join
Next, make sure to join domains through Configuration → Policies and Access Control → Domains → Active Directory Domains on each node. Please refer to Domain joining on a PacketFence cluster v14.x for detailed steps.
If domain joining fails on cluster nodes, see Network Connectivity Issues, Authentication Failures, and RADIUS Debugging in the Troubleshooting section.
4. Understanding the Galera cluster synchronization
The Galera cluster stack used by PacketFence resembles a lot to how a normal MariaDB Galera cluster behaves but it contains hooks to auto-correct some issues that can occur.
/usr/local/pf/logs/mariadb.log4.1. Quorum behavior
A loss of quorum is when a server is not able to be part of a group that represents more than 50% of the configured servers in the cluster. This can occur if a node is isolated from a network perspective or if more than 50% of its peers aren’t alive (like in the case of a power outage).
The Galera cluster stack will continuously check that it has a quorum. Should one of the server be part of a group that doesn’t have the quorum in the cluster, it will put itself in read-only mode and stop the synchronization. During that time, your PacketFence installation will continue working but with some features disabled.
- RADIUS MAC Authentication: Will continue working and will return RADIUS attributes associated with the role that is registered in the database. If VLAN or RADIUS filters can apply to this device, they will but any role change will not be persisted.
- RADIUS 802.1X: Will continue working and if 'Dot1x recompute role from portal' is enabled, it will compute the role using the available authentication sources but will not save it in the database at the end of the request. If this parameter is disabled, it will behave like MAC Authentication. VLAN and RADIUS filters will still apply for the connections. If any of your sources are external (LDAP, AD, RADIUS, …), they must be available for the request to complete successfully.
- Captive portal: The captive portal will be disabled and display a message stating the system is currently experiencing an issue.
- DHCP listeners: The DHCP listeners will be disabled and packets will not be saved in the database. This also means Firewall SSO will not work during that time.
- Admin interface: It will still be available in read-only mode for all sections and in read-write mode for the configuration section.
Once the server that is in read-only mode joins a quorum, it will go back in read-write mode and the system will go back to its normal behavior automatically.
If nodes fail to rejoin the cluster or remain in read-only mode unexpectedly, see Checking the MariaDB sync and Cluster Database Recovery in the Troubleshooting section for Galera synchronization issues.
4.2. Graceful shutdown behavior
When you are gracefully shutting down servers for a planned maintenance, you should always aim to leave a quorum alive so that once the server joins its peers again, it will always re-join the cluster gracefully. You can also leave only one of the nodes alive but keep in mind it will fall in read-only mode until all the nodes that were part of the last healthy quorum rejoin the cluster.
Should all your nodes shutdown gracefully, the last node to be shutdown will be
the one that will be able to self-elect as master when you bring the machines
back online. Bringing this node back online first is a best practice but not
mandatory. In order to know which server would be able to self-elect as master,
look for the node that has safe_to_bootstrap: 1 when executing the following
command cat /var/lib/mysql/grastate.dat | grep 'safe_to_bootstrap:'.
4.3. Ungraceful shutdown behavior
/var/lib/mysql/gvwstate.dat
exists on the node.If at least one node is still alive, other nodes will be able to connect to it and re-integrate the cluster.
If all nodes are ungracefuly shutdown at the same time, they will recover when all nodes boot back up. When all nodes are ungracefuly shutdown, but not at the same time, the galera-autofix service will elect one of the nodes as the new master and the cluster will recover. See the chapter on galera-autofix for details on this.
4.4. The galera-autofix service
PacketFence contains a service to automatically recover problematic MariaDB Galera nodes. In some cases (like with a full cluster hard shutdown or machines that are frozen), Galera cannot recover gracefully. This service will attempt to take the best decision on what to do to recover a healthy state in the cluster. It is important to note that when recovering a complete cluster failure, data loss may occur even though the service will attempt to determine the most advanced node of the cluster prior to the failure. If data loss is not an option for you, disable the galera-autofix service in the admin so that it doesn’t attempt any automated recovery of the cluster.
This service will only be able to join a failing node when one of the conditions below is met:
- The database is available on at least one of the members of the cluster.
- All of the nodes of the cluster are online on the network with their galera-autofix service started.
This service will not perform anything when one of the conditions below is met:
- One of the cluster nodes is disabled via /usr/local/pf/bin/cluster/node
- The packetfence-mariadb service is inactive in systemd
- The database is available on the local UNIX socket (/var/lib/mysql/mysql.sock)
- There is only one node in the cluster
This next section will describe how the service will behave and attempt the cluster recovery when necessary
4.4.1. Boot steps
-
Cooldown for 10 minutes after starting up so that MariaDB has a chance to join the cluster automatically.
-
Start a thread to report asynchronously the sequence number of this node to its peers.
4.4.2. Decision steps
-
Verify if the database is available on one of the peers (can connect to it and the
wsrep_cluster_statusisPrimary).-
If this succeeds, then we proceed to the 'Reset data and boot steps'
-
If this fails, we proceed in the next decision steps
-
-
Verify all nodes are pingable
-
If this succeeds, then we proceed to the next decision step
-
If this fails, then we cooldown for 1 minute and restart the decision steps from 'Decision step 2'
-
-
We wait for all the nodes to report their last recorded sequence number
-
If this succeeds, then we proceed to the next decision step
-
If this fails, then we cooldown for 1 minute and restart the decision steps from 'Decision step 2'
-
-
Selection of the node with the highest sequence number to boot as the new master
-
If this node has the highest sequence number then it elects itself as the new database master
-
If more than 1 node have the same sequence number, then the node that appears first in cluster.conf elects itself as the new database master
-
When the node doesn’t meet any of the conditions above, then it isn’t the one selected to be the new master, it proceeds to the 'Reset data and boot steps'
-
4.4.3. Reset data and boot steps
-
Force stop packetfence-mariadb to prevent any disruption caused by this node in a new cluster that could be forming
-
Wait at most 1 minute for the database to be available on at least one of the cluster nodes
-
If this succeeds, then we proceed to the next step
-
If this fails, we stop this process, start back packetfence-mariadb and start back at the beginning of the 'Decision steps'
-
-
We delete the content of the /var/lib/mysql/ directory
-
We start packetfence-mariadb normally
5. Troubleshooting a cluster
5.1. Checking the MariaDB sync
Check MariaDB sync by examining wsrep status values in MariaDB:
MariaDB> show status like 'wsrep%';
Important variables:
-
wsrep_cluster_status: Shows if node is part of primary view. Healthy clusters show 'primary' -
wsrep_incoming_addresses: Current cluster members. All cluster nodes should be listed -
wsrep_last_committed: Most recent committed transaction sequence number. Identifies most advanced node -
wsrep_local_state_comment: Cluster sync state. Healthy state is 'Synced'. See Galera documentation for other values
Healthy cluster requires: all nodes listed in wsrep_incoming_addresses and
wsrep_local_state_comment as Synced. Otherwise check MariaDB log
(/usr/local/pf/logs/mariadb.log).
5.2. Automatic clustering resolution service: galera-autofix
Since v10, the galera-autofix service will try
to resolve automatically issues on Galera clusters.
For problematic clusters, once all nodes are online, wait:
- ~10 minutes when at least one node offers database service
- ~20 minutes when no database service available
If issues persist, see resolution sections below.
5.3. Manual resolution
If galera-autofix service is not able to solve your issue, you can try to
solve it manually.
First, you need to perform checks. Then you will be able to identify in which situation you are: Cluster offers database service without all nodes or None of the nodes is offering database service.
5.3.1. Database checks
Ensure MariaDB is running on each node
Ensure you can connect to MariaDB (through UNIX socket) on each node using:
mysql -u root -p
Check cluster integrity
Once connected to MariaDB, run these commands on each node:
# Each node in the cluster should provide the same valueSHOW GLOBAL STATUS LIKE 'wsrep_cluster_state_uuid';# Each node in the cluster should provide the same valueSHOW GLOBAL STATUS LIKE 'wsrep_cluster_conf_id';# Expected value: number of configured nodes in the clusterSHOW GLOBAL STATUS LIKE 'wsrep_cluster_size';# Expected value: PrimarySHOW GLOBAL STATUS LIKE 'wsrep_cluster_status';
If all checks returned expected values, the cluster is up and has integrity.
Check individual node status
Once connected to MariaDB, run these commands on each node:
# Expected value: ONSHOW GLOBAL STATUS LIKE 'wsrep_ready';# Expected value: ONSHOW GLOBAL STATUS LIKE 'wsrep_connected';# Expected values when node is part of the primary component: Joining, Waitingon SST, Joined, Synced or DonorSHOW GLOBAL STATUS LIKE 'wsrep_local_state_comment';
If all checks returned expected values, individual nodes are in working order.
5.3.2. PacketFence checks
Check PacketFence application can connect to the database
In order to emulate how PacketFence connects to the database, you can run following command:
mysql -u $(perl -I/usr/local/pf/lib_perl/lib/perl5 -I/usr/local/pf/lib -Mpf::db -e 'print $pf::db::DB_Config->{user}') -p$(perl -I/usr/local/pf/lib_perl/lib/perl5 -I/usr/local/pf/lib -Mpf::db -e 'print $pf::db::DB_Config->{pass}') -h $(perl -I/usr/local/pf/lib_perl/lib/perl5 -I/usr/local/pf/lib -Mpf::db -e 'print $pf::db::DB_Config->{host}') pf
mysql -u $(perl -I/usr/local/pf/lib -Mpf::db -e 'print $pf::db::DB_Config->{user}') -p$(perl -I/usr/local/pf/lib -Mpf::db -e 'print $pf::db::DB_Config->{pass}') -h $(perl -I/usr/local/pf/lib -Mpf::db -e 'print $pf::db::DB_Config->{host}') pf
If you got a prompt, it means PacketFence must be able to connect to the database.
Perform a query using PacketFence codebase
To perform a small query to the database using PacketFence codebase, you can run:
/usr/local/pf/bin/pfcmd checkup
If the command doesn’t return any database error, PacketFence is able to perform reads on database.
5.3.3. Cluster offers database service without all nodes
When at least one of the nodes of the cluster is able to offer database service, you can apply the following commands on a broken node to rejoin it to the cluster:
systemctl stop packetfence-mariadbsystemctl stop packetfence-galera-autofixrm -fr /var/lib/mysql/*systemctl start packetfence-mariadbsystemctl start packetfence-galera-autofix
This action will not cause service disruption on current cluster.
After all nodes have joined back cluster, you should verify MariaDB sync.
packetfence-mariadb service, be sure there is no more mysql process running.5.3.4. None of the nodes is offering database service
When there is no more database service in your cluster, you need to do a full recovery.
You must identify the node you wish to keep the data from and start it with the
--force-new-cluster option.
Find the node which has the highest seqno value in
/var/lib/mysql/grastate.dat.
If the seqno value is -1, you need to start MariaDB manually with
--wsrep-recover to update the seqno value using the commands below:
systemctl stop packetfence-galera-autofixsystemctl stop packetfence-mariadbmysqld_safe --defaults-file=/usr/local/pf/var/conf/mariadb.conf --wsrep-recover
In MariaDB log file under /usr/local/pf/logs or in output of journalctl -u packetfence-mariadb, you should
find a line like this:
[Note] WSREP: Recovered position: 220dcdcb-1629-11e4-add3-aec059ad3734:1122
The recovered position is a pair <cluster state UUID>:<sequence
number>. The node with the highest sequence number in its
recovered position is the most up-to-date, and should be chosen as
bootstrap candidate.
Once you have identified the most up-to-date node, run following commands on it:
systemctl stop packetfence-mariadbsystemctl stop packetfence-galera-autofix/usr/local/pf/sbin/pf-mariadb --force-new-cluster
packetfence-mariadb service, be sure there is no more mysql process running.5.3.5. On each of the discarded servers
First, stop packetfence-mariadb and packetfence-galera-autofix on all
the servers you want to discard data from.
systemctl stop packetfence-mariadbsystemctl stop packetfence-galera-autofix
On each of the servers you want to discard the data from, you must destroy all
the data in /var/lib/mysql and start packetfence-mariadb so it resyncs its
data from scratch.
rm -fr /var/lib/mysql/*systemctl start packetfence-mariadb
You should then see /var/lib/mysql be populated again with the data and once
MariaDB becomes available again on the server, it means the sync has
completed. In case of issues, look in the MariaDB log file
(/usr/local/pf/logs/mariadb.log)
packetfence-mariadb service, be sure there is no more mysql process running.5.3.6. On the node started with --force-new-cluster
If you were performing a full recovery, you should now break the
--force-new-cluster command and start packetfence-mariadb
normally using:
systemctl start packetfence-mariadb
5.3.7. On all servers
When your database offers service again, you can restart
packetfence-galera-autofix service using:
systemctl start packetfence-galera-autofix
Be sure to verify MariaDB sync.
6. Maintenance and Operations
6.1. Putting nodes in maintenance
When doing maintenance on a cluster, it is always preferred to set the targeted nodes in a maintenance mode so they don’t try to join an existing cluster. You can achieve this using two methods.
6.1.1. Using a clean shutdown
If you stop the packetfence-mariadb service properly on a node or if you
shutdown your node properly, the cluster will detect this shutdown and continue
to
operate.
6.1.2. Using --maintenance flag
In order to activate the maintenance mode on a node:
/usr/local/pf/bin/cluster/maintenance --activate
In order to deactivate the maintenance mode on a node:
/usr/local/pf/bin/cluster/maintenance --deactivate
In order to see the current maintenance state on a node:
/usr/local/pf/bin/cluster/maintenance
6.2. Shutting down a PacketFence Active/Active cluster of three nodes
As PacketFence cluster works in an active/active way, with statefull redundance, the order to stop the servers is not very important.
Example:
- Stop order: pf1 → pf2 → pf3
- Start order: pf3 → pf2 → pf1
Shutdown the servers:
- Logon to the first server with a SSH terminal
- Type the following command: shutdown -h now
- Logon to the next server, with a SSH terminal.
- Type the following command: ping IP_ADDRESS_OF_THE_FIRST_SERVER
- Once the server do not responce back, type the following command: shutdown -h now
- Proceed the same way with the last server.
6.3. Bringing up a PacketFence Active/Active cluster of three nodes
We want to bring up the cluster, in the same state it was before the shutdown.
Therefore, we will do the Shutting down procedure, but in reverse.
6.3.1. Bring up the "Last" server stopped
Start the server (pf3 in our example) and wait a couple of minutes and ensure you are able to connect to it using SSH before continuing.
6.3.2. Bring up the next server
Start the next server (pf2 in our example), logon to the SSH terminal.
Once prompted, check the packetFence-mariadb sync with the Master, type the command:
mysql -u root -pMariaDB> show status like 'wsrep%';
MariaDB [(none)]> show status like "wsrep%";+------------------------------+-------------------------------------------------------+| Variable_name | Value |+------------------------------+-------------------------------------------------------+...| wsrep_cluster_size | 2 |...| wsrep_connected | ON |...| wsrep_evs_state | OPERATIONAL |...| wsrep_local_state_comment | Synced |...+------------------------------+-------------------------------------------------------+
6.3.3. Bring up the next server
Once the 2 other servers have synced together, you can start the next server that remains. Logon on terminal and go with a show status like 'wsrep%'; once again.
- The values must have changed to:
MariaDB [(none)]> show status like "wsrep%";+------------------------------+-------------------------------------------------------+| Variable_name | Value |+------------------------------+-------------------------------------------------------+...| wsrep_cluster_size | 3 |...| wsrep_evs_state | OPERATIONAL |...| wsrep_local_state_comment | Synced |...+------------------------------+-------------------------------------------------------+
6.4. Backup procedure
6.4.1. Automatic Backup files
The PacketFence servers have a daily backup done, each night (0:30AM).
To externalize those backups, locate them in:
/root/backup
File description:
- packetfence-exportable-backup-DATE_00h30.tgz is an exportable packetfence backup that contains:
-
packetfence-db-dump-innobackup-DATE_00h30.xbstream.gzare the SQL dump of the MariaDB database. -
packetfence-config-dump-DATE_00h30.tgzare the dump of the PacketFence files.
6.4.2. Manual backups
To make a "manual" backup, execute the following command:
/usr/local/pf/addons/exportable-backup.sh
Like the daily automatic backups, the file will be located in:
/root/backup/
Exportable file will be available, tagged with the Date and Time of the backup.
For cluster maintenance issues or service failures, see Service Startup Failures, Checking the MariaDB sync, and Cluster Database Recovery in the Troubleshooting section.
7. Layer 3 clusters
PacketFence supports having clusters where servers are located in multiple layer 3 networks which we will also refer as cluster zones.
Simple RADIUS only clusters are more simple and can be configured without too much in-depth knowledge, but using the captive portal with a layer 3 cluster will definitely make the setup more complex and will certainly require a lot of thinking and understanding on how PacketFence works to be able to know how to properly design a cluster like this.
This section will describe the changes to do on the cluster.conf
when dealing with layer 3 clusters but doesn’t cover all the cluster
installation. In order to install the cluster, follow the instructions in
Cluster Setup and refer to this section when reaching the step to configure
the cluster.conf.
7.1. Simple RADIUS only cluster
In order to configure a RADIUS only layer 3 cluster, at least 3 servers (5 are used in this example) with a single interface (used for management).
Cluster design and behavior:
- This example will use 3 servers in a network (called DC1), and 2 in another network (called DC2).
- Each group of server (in the same L2 network) will have a virtual IP address and will perform load-balancing to members in the same L2 zone (i.e. same network).
- All the servers will use MariaDB Galera cluster and will be part of the same database cluster meaning all servers will have the same data.
- In the event of the loss of DC1 or a network split between DC1 and DC2, the databases on DC2 will go in read-only and will exhibit the behavior described in "Quorum behavior".
- All the servers will share the same configuration and same cluster.conf. The data in cluster.conf will serve as an overlay to the data in pf.conf to perform changes specific to each layer 3 zone.
Things to take into consideration while performing the cluster setup:
- While going through the configurator to configure the network interfaces, only a single interface is needed and its type should be set to management and high-availability.
7.1.1. Cluster configuration
When at the step where the cluster.conf needs to be configured during the cluster setup, refer to the example below to build the cluster.conf.
[general]multi_zone=enabled[DC1 CLUSTER]management_ip=192.168.1.10[DC1 CLUSTER interface ens192]ip=192.168.1.10[DC1 pf1-dc1.example.com]management_ip=192.168.1.11[DC1 pf1-dc1.example.com interface ens192]ip=192.168.1.11[DC1 pf2-dc1.example.com]management_ip=192.168.1.12[DC1 pf2-dc1.example.com interface ens192]ip=192.168.1.12[DC1 pf3-dc1.example.com]management_ip=192.168.1.13[DC1 pf3-dc1.example.com interface ens192]ip=192.168.1.13[DC2 CLUSTER]management_ip=192.168.2.10[DC2 CLUSTER interface ens192]ip=192.168.2.10[DC2 pf1-dc2.example.com]management_ip=192.168.2.11[DC2 pf1-dc2.example.com interface ens192]ip=192.168.2.11[DC2 pf2-dc2.example.com]management_ip=192.168.2.12[DC2 pf2-dc2.example.com interface ens192]ip=192.168.2.12
Notes on the configuration:
- The hostnames (pf1-dc1.example.com, pf2-dc1.example.com, etc) are not directly related to the cluster logic and the servers can have any hostname without impacting the cluster behavior. The assignment of a server to a cluster zone is made by the first part of the section name (ex: "DC1 pf.example.com" assigns server "pf.example.com" to cluster zone "DC1")
- Each cluster zone needs to have its own "CLUSTER" definition that declares the virtual IPs to use for this cluster zone. This also declares the management IP on which the zone should be joined.
- Given the zones aren’t in the same layer 2 network, the same virtual IP cannot be used between zones.
- Always declare a "CLUSTER" definition even though a zone has only a single server.
- The network equipment should point RADIUS authentication and accounting to both virtual IPs (192.168.1.10 and 192.168.2.10 in this example) either in primary/secondary or load-balancing mode.
- RFC3576 servers (CoA and RADIUS disconnect) should be declared on the network equipment (if supported) for both virtual IPs (192.168.1.10 and 192.168.2.10 in this example)
- Any virtual IP can be used to update configuration: it will be sync between cluster zones
7.2. RADIUS server with captive-portal
In order to configure a RADIUS server with a captive-portal on a layer 3 cluster, at least 3 servers are needed (5 are used in this example) with 2 interfaces (one for management and one for registration).
Cluster design and behavior:
- This example will use 3 servers in a network (called DC1), and 2 in another network (called DC2).
- Each group of server (in the same L2 network) will have a virtual IP address and will perform load-balancing (RADIUS, HTTP) to members in the same L2 zone (i.e. same network).
- All the servers will use MariaDB Galera cluster and will be part of the same database cluster meaning all servers will have the same data.
- In the event of the loss of DC1 or a network split between DC1 and DC2, the databases on DC2 will go in read-only and will exhibit the behavior described in "Quorum behavior".
- All the servers will share the same configuration and same cluster.conf. The data in cluster.conf will serve as an overlay to the data in pf.conf and networks.conf to perform changes specific to each layer 3 zone.
The schema below presents the routing that needs to be setup in the network in order to deploy this example:
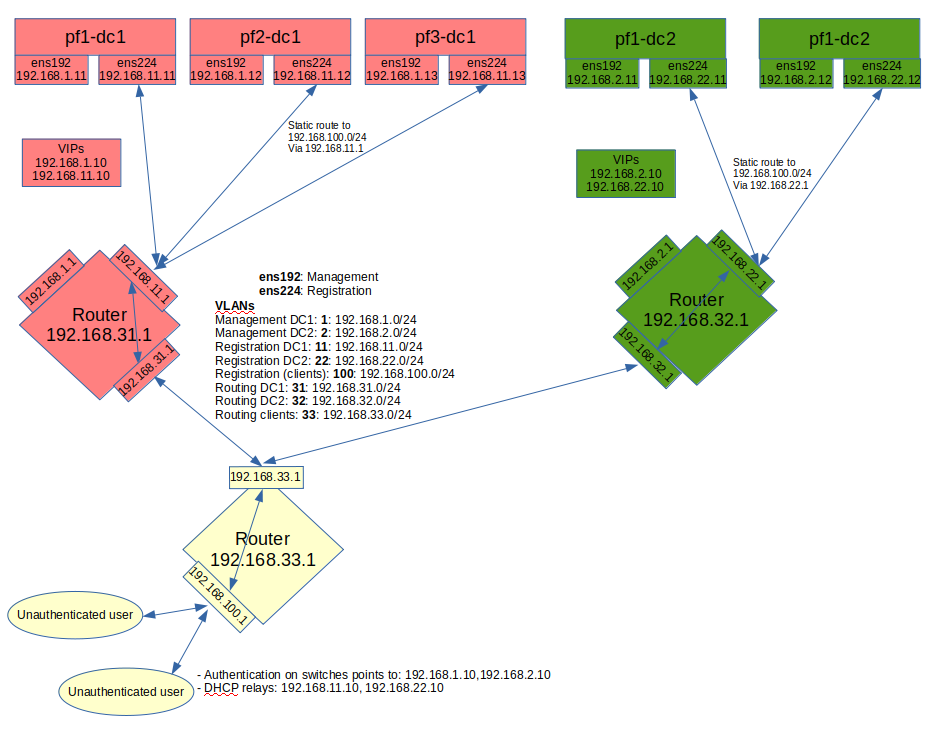
Notes on the schema:
- The static routes from the PacketFence servers to the gateways on the network equipment will be configured through networks.conf and do not need to be configured manually on the servers. Simply declare the remote networks so that PacketFence offers DHCP on them and routes them properly.
- Since the network of the clients is not directly connected to the PacketFence servers via layer 2, IP helper (DHCP relaying) must be used on the network equipment that points to both virtual IPs of the cluster.
- This assumes that the routers are able to route all the different networks that are involved for registration (192.168.11.0/24, 192.168.22.0/24, 192.168.100.0/24) and that any client in these 3 networks can be routed to any of these networks via its gateway (192.168.11.1, 192.168.22.2, 192.168.100.1).
- Access lists should be put in place to restrict the clients (network 192.168.100.0/24) from accessing networks other than the 3 registrations networks.
- No special routing is required for the management interface.
Things to take into consideration while performing the cluster setup:
- While going through the configurator to configure the network interfaces, set an interface to management and high-availability.
- While going through the configurator to configure the network interfaces, set an interface to registration.
7.2.1. Cluster configuration
When at the step where the cluster.conf needs to be configured during the cluster setup, refer to the example below to build the cluster.conf.
[general]multi_zone=enabled[DC1 CLUSTER]management_ip=192.168.1.10[DC1 CLUSTER interface ens192]ip=192.168.1.10[DC1 CLUSTER interface ens224]ip=192.168.11.10[DC1 pf1-dc1.example.com]management_ip=192.168.1.11[DC1 pf1-dc1.example.com interface ens192]ip=192.168.1.11[DC1 pf1-dc1.example.com interface ens224]ip=192.168.11.11[DC1 pf2-dc1.example.com]management_ip=192.168.1.12[DC1 pf2-dc1.example.com interface ens192]ip=192.168.1.12[DC1 pf2-dc1.example.com interface ens224]ip=192.168.11.12[DC1 pf3-dc1.example.com]management_ip=192.168.1.13[DC1 pf3-dc1.example.com interface ens192]ip=192.168.1.13[DC1 pf3-dc1.example.com interface ens224]ip=192.168.11.13[DC2 CLUSTER]management_ip=192.168.2.10[DC2 CLUSTER interface ens192]ip=192.168.2.10[DC2 CLUSTER interface ens224]ip=192.168.22.10[DC2 pf1-dc2.example.com]management_ip=192.168.2.11[DC2 pf1-dc2.example.com interface ens192]ip=192.168.2.11[DC2 pf1-dc2.example.com interface ens224]ip=192.168.22.11[DC2 pf2-dc2.example.com]management_ip=192.168.2.12[DC2 pf2-dc2.example.com interface ens192]ip=192.168.2.12[DC2 pf2-dc2.example.com interface ens224]ip=192.168.22.12
Notes on the configuration:
- The hostnames (pf1-dc1.example.com, pf2-dc1.example.com, etc) are not directly related to the cluster logic and the servers can have any hostname without impacting the cluster behavior. The assignment of a server to a cluster zone is made by the first part of the section name (ex: "DC1 pf.example.com" assigns server "pf.example.com" to cluster zone "DC1")
- Each cluster zone needs to have its own "CLUSTER" definition that declares the virtual IPs to use for this cluster zone. This also declares the management IP on which the zone should be joined.
- Given the zones aren’t in the same layer 2 network, the same virtual IP cannot be used between zones.
- Always declare a "CLUSTER" definition even though a zone has only a single server.
- The network equipment should point RADIUS authentication and accounting to both virtual IPs (192.168.1.10 and 192.168.2.10 in this example) either in primary/secondary or load-balancing mode.
- RFC3576 servers (CoA and RADIUS disconnect) should be declared on the network equipment (if supported) for both virtual IPs (192.168.1.10 and 192.168.2.10 in this example)
- Any virtual IP can be used to update configuration: it will be sync between cluster zones
7.2.2. Servers network configuration
After finishing configuring the cluster, on one of the servers, add the following in cluster.conf in order to configure both zones registration networks:
[DC1 CLUSTER network 192.168.11.0]dns=192.168.11.10split_network=disableddhcp_start=192.168.11.10gateway=192.168.11.10domain-name=vlan-registration.example.comnat_enabled=disablednamed=enableddhcp_max_lease_time=30fake_mac_enabled=disableddhcpd=enableddhcp_end=192.168.11.246type=vlan-registrationnetmask=255.255.255.0dhcp_default_lease_time=30[DC2 CLUSTER network 192.168.22.0]dns=192.168.22.10split_network=disableddhcp_start=192.168.22.10gateway=192.168.22.10domain-name=vlan-registration.example.comnat_enabled=disablednamed=enableddhcp_max_lease_time=30fake_mac_enabled=disableddhcpd=enableddhcp_end=192.168.22.246type=vlan-registrationnetmask=255.255.255.0dhcp_default_lease_time=30
7.2.3. Client network configuration
Now, add the following in networks.conf in order to declare the common parameters for the clients in both zones
[192.168.100.0]gateway=192.168.100.1dhcp_start=192.168.100.20domain-name=vlan-registration.example.comnat_enabled=0named=enableddhcp_max_lease_time=30dhcpd=enabledfake_mac_enabled=disablednetmask=255.255.255.0type=vlan-registrationdhcp_end=192.168.100.254dhcp_default_lease_time=30
Then, to complete the client network configuration, override the next hop (route to reach the network) and DNS server in cluster.conf by adding the following:
[DC1 CLUSTER network 192.168.100.0]next_hop=192.168.11.1dns=192.168.11.10[DC2 CLUSTER network 192.168.100.0]next_hop=192.168.22.1dns=192.168.22.10
7.2.4. Synchronization and wrapping-up
Then, reload the configuration and sync the cluster from the server on which the configuration has been performed:
/usr/local/pf/bin/cluster/sync --as-master/usr/local/pf/bin/pfcmd configreload hard
Now restart PacketFence on all servers using:
/usr/local/pf/bin/pfcmd service pf restart
7.3. Remote MariaDB slave server
In cluster layer3 configuration, configure a remote MariaDB server in
slave mode. This will allow the primary database to be replicated from the
central DC to the remote site.
In normal operation the remote server will use the main sites database. However,
when the link is broken the remote server will fallback and use its own local
database in read-only mode.
packetfence-haproxy-db service is responsible to detect when link between DC2
and DC1 is down.
For this configuration at least 3 servers are needed at the main site and at least 1 server is needed at the remote site.
7.3.1. Prepare the configuration
To configure PacketFence first turn ON "Master/Slave mode" in Configuration → System Configuration → Database → Advanced.
Next configure cluster.conf during the initial cluster setup, refer to the example below.
[general]multi_zone=enabled[DC1 CLUSTER]management_ip=192.168.1.10[DC1 CLUSTER interface ens192]ip=192.168.1.10mask=255.255.255.0type=management[DC1 CLUSTER interface ens224]ip=192.168.11.10mask=255.255.255.0enforcement=vlantype=internal[DC1 pf1-dc1.example.com]management_ip=192.168.1.11[DC1 pf1-dc1.example.com interface ens192]ip=192.168.1.11mask=255.255.255.0type=management[DC1 pf1-dc1.example.com interface ens224]ip=192.168.11.11mask=255.255.255.0enforcement=vlantype=internal[DC1 pf2-dc1.example.com]management_ip=192.168.1.12[DC1 pf2-dc1.example.com interface ens192]ip=192.168.1.12mask=255.255.255.0type=management[DC1 pf2-dc1.example.com interface ens224]ip=192.168.11.12mask=255.255.255.0enforcement=vlantype=internal[DC1 pf3-dc1.example.com]management_ip=192.168.1.13[DC1 pf3-dc1.example.com interface ens192]ip=192.168.1.13mask=255.255.255.0type=management[DC1 pf3-dc1.example.com interface ens224]ip=192.168.11.13mask=255.255.255.0enforcement=vlantype=internal[DC2 CLUSTER]management_ip=192.168.2.10masterslavemode=SLAVEmasterdb=DC1[DC2 CLUSTER interface ens192]ip=192.168.2.10mask=255.255.255.0type=management[DC2 CLUSTER interface ens224]ip=192.168.22.10mask=255.255.255.0enforcement=vlantype=internal[DC2 pf1-dc2.example.com]management_ip=192.168.2.11[DC2 pf1-dc2.example.com interface ens192]ip=192.168.2.11mask=255.255.255.0type=management[DC2 pf1-dc2.example.com interface ens224]ip=192.168.22.11mask=255.255.255.0enforcement=vlantype=internal
Note that in the DC2 CLUSTER section we defined this 2 values:
masterslavemode=SLAVEmasterdb=DC1
This mean that the cluster will be in SLAVE mode and will use the db of the DC1 cluster.
And we MUST defined the type and the enforcement on all the interfaces.
7.3.2. Prepare and start the master/slave replication
In order to setup the master a recent backup is required. Backups created prior to the inclusion of this feature will not work. Recent backups now include the replication runtime position of the binary logfile. First restart packetfence-mariadb on all of the servers in the main cluster.
systemctl restart packetfence-mariadb
Run the /usr/local/pf/addons/exportable-backup.sh script on the master node of the main cluster. If the master server is unknown, the master, run this command on all nodes in the main cluster and, thanks to the database backup size, the master will have the bigger backup file (eg: /root/backup/packetfence-exportable-backup-YYYY-MM-DD_HHhss.tgz) that contains files and database. Transfer this file to the remote server (eg: /root/backup/)
Connect to the remote server and perform the following to sync the configuration from the master cluster:
/usr/local/pf/bin/cluster/sync --from=192.168.1.11 --api-user=packet --api-password=anotherMoreSecurePassword/usr/local/pf/bin/pfcmd configreload hard
Then the following command to import the backup:
/usr/local/pf/addons/full-import/import.sh --db -f /root/backup/packetfence-exportable-backup-YYYY-MM-DD_HHhss.tgzsystemctl start packetfence-mariadb
On the master node of the main cluster, grant replication for the replication user:
mysql -uroot -pMariaDB [(none)]> GRANT REPLICATION SLAVE ON *.* TO 'pfcluster'@'%';MariaDB [(none)]> FLUSH PRIVILEGES;
Lastly, run the following script on the remote server to start the slave replication.
/usr/local/pf/addons/makeslave.plEnter the MySQL root password: passwordEnter the MySQL master ip address: 192.168.1.11
The "MySQL master ip address" is the ip address of the master server where the backup file was created. Not the VIP of the primary cluster.
In the case when running the script, the following message appears:
ERROR 1045 (28000) at line 1: Access denied for user 'root'@'%' (usingpassword: YES)Unable to grant replication on user pfcluster at ./addons/makeslave.pl line 42,<STDIN> line 2.
Then ensure that the root user exists in the remote database and have the correct permissions (SELECT and GRANT):
SELECT * FROM mysql.user WHERE User='root' and host ='%'\GGRANT GRANT OPTION ON *.* TO root@'%' identified by 'password';GRANT SELECT ON *.* TO root@'%' identified by 'password';FLUSH PRIVILEGES;
Alternatively, to start the slave manually refer to the following:
Edit the file /root/backup/restore/xtrabackup_binlog_info and note the file name and the position:
mariadb-bin.000014 7473
On the master server of the main cluster - where the backup was created - run the following command:
mysql -uroot -p -e "SELECT BINLOG_GTID_POS('mariadb-bin.000014', 7473)"+---------------------------------------------+| BINLOG_GTID_POS('mariadb-bin.000014', 7473) |+---------------------------------------------+| 22-2-10459 |+---------------------------------------------+mysql -uroot -pMariaDB [(none)]> GRANT REPLICATION SLAVE ON *.* TO 'pfcluster'@'%';MariaDB [(none)]> FLUSH PRIVILEGES;
On the remote site master server run the following MySQL command as root:
SET GLOBAL gtid_slave_pos = '22-2-10459';CHANGE MASTER TO MASTER_HOST='192.168.1.11', MASTER_PORT=3306,MASTER_USER='pfcluster', MASTER_PASSWORD='clusterpf',MASTER_USE_GTID=slave_pos;START SLAVE;
The replication MASTER_USER and MASTER_PASSWORD can be found in the main sites pf.conf. The MASTER_HOST is the ip address of the master server on the main site - where the backup was created. Do not use the VIP.
At the end, to check the status of the slave server for debug purposes, run the following command:
SHOW SLAVE STATUS;//=== Geo Distributed Database////You can configure PacketFence to use a specific server for all the writes and different server(s) for the reads. Using this design will allow you to deploy instances of PacketFence in availability zones that aren't close to each other. A PacketFence server should always have a read replica that is close to it (<5ms latency) but the primary server handling writes can have a higher latency (>100ms).////==== Prepare the configuration////First we assume that you have 2 MySQL servers, one is the primary (192.46.222.200) and the other is a replica (170.187.181.132). This guide doesn't cover setting up MySQL primary/replicas and we strongly suggest you rely on cloud providers offering it as a service since managing MySQL primary/replicas can be complex.////Next configure cluster.conf during the initial cluster setup, refer to the example below.////----//[general]//multi_zone=enabled////[DC1 CLUSTER]//management_ip=192.168.1.10//db_write=192.46.222.200//db_read=192.46.222.200////[DC1 CLUSTER interface ens192]//ip=192.168.1.10//mask=255.255.255.0//type=management////[DC1 CLUSTER interface ens224]//ip=192.168.11.10//mask=255.255.255.0//enforcement=vlan//type=internal////[DC1 pf1-dc1.example.com]//management_ip=192.168.1.11////[DC1 pf1-dc1.example.com interface ens192]//ip=192.168.1.11//mask=255.255.255.0//type=management////[DC1 pf1-dc1.example.com interface ens224]//ip=192.168.11.11//mask=255.255.255.0//enforcement=vlan//type=internal////[DC1 pf2-dc1.example.com]//management_ip=192.168.1.12////[DC1 pf2-dc1.example.com interface ens192]//ip=192.168.1.12//mask=255.255.255.0//type=management////[DC1 pf2-dc1.example.com interface ens224]//ip=192.168.11.12//mask=255.255.255.0//enforcement=vlan//type=internal////[DC1 pf3-dc1.example.com]//management_ip=192.168.1.13////[DC1 pf3-dc1.example.com interface ens192]//ip=192.168.1.13//mask=255.255.255.0//type=management////[DC1 pf3-dc1.example.com interface ens224]//ip=192.168.11.13//mask=255.255.255.0//enforcement=vlan//type=internal////[DC2 CLUSTER]//management_ip=192.168.2.10//db_write=192.46.222.200//db_read=170.187.181.132////[DC2 CLUSTER interface ens192]//ip=192.168.2.10//mask=255.255.255.0//type=management////[DC2 CLUSTER interface ens224]//ip=192.168.22.10//mask=255.255.255.0//enforcement=vlan//type=internal////[DC2 pf1-dc2.example.com]//management_ip=192.168.2.11////[DC2 pf1-dc2.example.com interface ens192]//ip=192.168.2.11//mask=255.255.255.0//type=management////[DC2 pf1-dc2.example.com interface ens224]//ip=192.168.22.11//mask=255.255.255.0//enforcement=vlan//type=internal//----////In this example, DC1 will send its reads and writes to the primary database and DC2 will send its writes to the primary database and its reads to the replica located in DC2. You can have multiple comma-delimited read replicas defined in `db_read` which will be used in priority in the order they are defined.////Only a single `db_write` should be used, if redundancy is expected, use an external virtual IP or load balancer to handle fail-over in your external database.
8. Advanced configuration
8.1. Removing a server from the cluster
First, you will need to stop PacketFence on your server and put it offline:
/usr/local/pf/bin/pfcmd service pf stopshutdown -h now
Then you need to remove all the configuration associated to the server from
/usr/local/pf/conf/cluster.conf on one of the remaining nodes.
Configuration for a server is always prefixed by the server’s hostname.
Once you have removed the configuration, you need to reload it and synchronize it with the remaining nodes in the cluster.
# /usr/local/pf/bin/cluster/sync --as-master# /usr/local/pf/bin/pfcmd configreload hard
Now restart PacketFence on all the servers so that the removed node is not part of the clustering configuration.
Note that if you remove a node and end up having an even number of servers, you will get unexpected behaviors in MariaDB. You should always aim to have an odd number of servers at all time in your cluster.
8.2. Resynchronizing the configuration manually
If you did a manual change in a configuration file, an additional step is now needed.
In order to be sure the configuration is properly synced on all nodes, you will need to enter this command on the previously selected master node.
# /usr/local/pf/bin/cluster/sync --as-master
8.3. Adding files to the synchronization
In the event that you do modifications to non-synchronized files like switch
modules, files in raddb/, etc, you can add those files to be synchronized when
using /usr/local/pf/bin/cluster/sync.
On one of the nodes, create /usr/local/pf/conf/cluster-files.txt
Add the additional files one per line in this file. We advise you add this file to the synchronization too.
Example :
/usr/local/pf/conf/cluster-files.txt/usr/local/pf/raddb/modules/mschap
8.4. HAProxy dashboard
You have the possibility to configure the HAProxy dashboard on each node which will give you statistics about the current state of your cluster.
Configuration is done in /usr/local/pf/conf/haproxy-portal.conf:
listen statsbind %%management_ip%%:1025mode httptimeout connect 10stimeout client 1mtimeout server 1mstats enablestats uri /statsstats realm HAProxy\ Statisticsstats auth admin:packetfence
Now restart haproxy-portal in all nodes in order to complete the
configuration:
# /usr/local/pf/bin/pfcmd service haproxy-portal restart
You should now be able to connect to the dashboard on each node using following URL : http://NODE_MANAGEMENT_IP:1025/stats
haproxy-db with port 1026 in
haproxy-db.conf
NOTE: The same principle can be applied to haproxy-admin with port 1027 in
haproxy-admin.conf8.5. Configuration conflict handling
When modifying the configuration through the admin interface, the configuration will be automatically synchronized to all the nodes that are online. In the event that one or more nodes cannot be updated, an error message will be displayed with affected nodes.
A scheduled check runs on the management server (controlled through
maintenance.cluster_check_interval) in order to validate if all servers are
running the same configuration version.
When the failed node(s) will come back online, that scheduled check will ensure
that the new configuration is pushed on the new node(s).
You can disable this check by setting maintenance.cluster_check_interval to 0
and restarting pfcron. In that case, you will need to manually resolve the
conflict when the node(s) come back online by running
/usr/local/pf/bin/cluster/sync --as-master on the node you want to keep the
configuration of.
General facts about conflict resolution:
- If the configuration is not pushed to at least half of the servers of your cluster, when the failed nodes will come back online, they will have quorum on the previous configuration and the one they are running will be pushed to all the servers.
- In a two node cluster, the most recent configuration is always selected when resolving a conflict.
- In a two node cluster, no decision is taken unless the peer server has its webservices available.
8.5.1. Going deeper in the conflict handling
The section below will explain with more details, the steps that are taken in order to take the decision of which server should be declared as the master when one or more servers have conflicting configuration version.
The first step is to get the configuration version from each server through a webservice call.
The results are then organized by version identifier. Should all alive servers run the same version, the state is considered as healthy and nothing happens.
Then, should there be more than one version identifier across the alive servers, the algorithm validates that there are at least 2 servers configured in the cluster. If there aren’t, then the most recent version is pushed on the peer node.
After that, the algorithm looks at which version is on the most servers. In the event that the dead servers are in higher number than the alive ones, the most recent version is taken. Otherwise, the version that is present on the most servers will be selected.
When pushing a version to the other servers, if the current server has the most recent version or is part of the quorum (depending on which push strategy was defined above), then it will be the one pushing the new configuration to the other servers. Otherwise, a webservice call is made to one of the servers running the selected version so that it pushes its configuration to its peers.
9. Troubleshooting Clusters
9.1. Checking the MariaDB sync
Check MariaDB sync by examining wsrep status values in MariaDB:
MariaDB> show status like 'wsrep%';
Important variables:
-
wsrep_cluster_status: Shows if node is part of primary view. Healthy clusters show 'primary' -
wsrep_incoming_addresses: Current cluster members. All cluster nodes should be listed -
wsrep_last_committed: Most recent committed transaction sequence number. Identifies most advanced node -
wsrep_local_state_comment: Cluster sync state. Healthy state is 'Synced'. See Galera documentation for other values
Healthy cluster requires: all nodes listed in wsrep_incoming_addresses and
wsrep_local_state_comment as Synced. Otherwise check MariaDB log
(/usr/local/pf/logs/mariadb.log).
9.2. Cluster Database Recovery
9.2.1. Cluster offers database service without all nodes
When at least one of the nodes of the cluster is able to offer database service, you can apply the following commands on a broken node to rejoin it to the cluster:
systemctl stop packetfence-mariadbsystemctl stop packetfence-galera-autofixrm -fr /var/lib/mysql/*systemctl start packetfence-mariadbsystemctl start packetfence-galera-autofix
This action will not cause service disruption on current cluster.
packetfence-mariadb service, be sure there is no more mysql process running.9.2.2. None of the nodes is offering database service
When there is no more database service in your cluster, you need to do a full recovery.
You must identify the node you wish to keep the data from and start it with the
--force-new-cluster option.
Find the node which has the highest seqno value in
/var/lib/mysql/grastate.dat.
If the seqno value is -1, you need to start MariaDB manually with
--wsrep-recover to update the seqno value using the commands below:
systemctl stop packetfence-galera-autofixsystemctl stop packetfence-mariadbmysqld_safe --defaults-file=/usr/local/pf/var/conf/mariadb.conf --wsrep-recover
In MariaDB log file under /usr/local/pf/logs or in output of journalctl -u packetfence-mariadb, you should
find a line like this:
[Note] WSREP: Recovered position: 220dcdcb-1629-11e4-add3-aec059ad3734:1122
The recovered position is a pair <cluster state UUID>:<sequence
number>. The node with the highest sequence number in its
recovered position is the most up-to-date, and should be chosen as
bootstrap candidate.
Once you have identified the most up-to-date node, run following commands on it:
systemctl stop packetfence-mariadbsystemctl stop packetfence-galera-autofix/usr/local/pf/sbin/pf-mariadb --force-new-cluster
packetfence-mariadb service, be sure there is no more mysql process running.9.3. Service Startup Failures
If services fail to start after upgrade or configuration changes:
-
Check service status using:
/usr/local/pf/bin/pfcmd service pf status -
Examine log files in
/usr/local/pf/logsfor specific service error messages -
Verify database connectivity before starting services
-
Check configuration syntax using:
/usr/local/pf/bin/pfcmd checkup -
For network-related service failures, verify interface configuration and IP addresses
-
If httpd services fail, check Apache error logs and verify SSL certificate validity
9.3.1. Common Service Issues
-
Admin Interface Access Issues: If admin interface shows "Internet Explorer cannot display the webpage":
-
Check if admin interface is started:
/usr/local/pf/bin/pfcmd service httpd.admin start - For IE 8-10: Enable TLS v1.2 in browser settings (Tools → Internet Options → Advanced)
- Verify SSL certificate matches hostname
-
Check if admin interface is started:
-
MariaDB Service Issues: If MariaDB fails to start, check:
tail -f /usr/local/pf/logs/mariadb.log -
Service Restart Commands: For specific service troubleshooting:
# Restart RADIUS services/usr/local/pf/bin/pfcmd service radiusd restart# Restart NTLM authentication APIsystemctl restart packetfence-ntlm-auth-api# Restart specific detection services/usr/local/pf/bin/pfcmd service pfdetect restart/usr/local/pf/bin/pfcmd service pfqueue restart -
Monitoring Service Logs: Use journalctl for real-time log monitoring:
journalctl -f -u packetfence-mariadbjournalctl -f # Monitor all system logs
9.4. Database Connectivity Issues
Check PacketFence application can connect to the database by emulating how PacketFence connects:
mysql -u $(perl -I/usr/local/pf/lib_perl/lib/perl5 -I/usr/local/pf/lib -Mpf::db -e 'print $pf::db::DB_Config->{user}') -p$(perl -I/usr/local/pf/lib_perl/lib/perl5 -I/usr/local/pf/lib -Mpf::db -e 'print $pf::db::DB_Config->{pass}') -h $(perl -I/usr/local/pf/lib_perl/lib/perl5 -I/usr/local/pf/lib -Mpf::db -e 'print $pf::db::DB_Config->{host}') pf
mysql -u $(perl -I/usr/local/pf/lib -Mpf::db -e 'print $pf::db::DB_Config->{user}') -p$(perl -I/usr/local/pf/lib -Mpf::db -e 'print $pf::db::DB_Config->{pass}') -h $(perl -I/usr/local/pf/lib -Mpf::db -e 'print $pf::db::DB_Config->{host}') pf
If you got a prompt, it means PacketFence must be able to connect to the database.
To perform a small query to the database using PacketFence codebase:
/usr/local/pf/bin/pfcmd checkup
If the command doesn’t return any database error, PacketFence is able to perform reads on database.
Common Database Connection Issues:
-
Too Many Connections: Default MariaDB limit is often too low (100). Increase to at least 300 for wireless environments with heavy RADIUS traffic.
-
Host Blocked: After 10 connection timeouts, MariaDB may block the host. Check for "Host <hostname> is blocked" errors.
-
Custom Database Configuration: If API requests return errors, check
packetfence.logfor full MySQL error messages. -
Configuration Reload: After database configuration changes, run:
/usr/local/pf/bin/pfcmd configreload hard
9.5. Network Connectivity Issues
For network-related problems:
Basic Network Diagnostics:
-
Verify interface configuration and IP addresses:
ip addr show -
Check network service status:
/usr/local/pf/bin/pfcmd service pf status | grep -E "(dhcpd|pfdhcp|keepalived)" -
Test connectivity to network devices (switches, wireless controllers):
ping switch-ip-address -
Verify SNMP connectivity to network devices:
snmpwalk -v2c -c community switch-ip-address system -
For VLAN enforcement issues, check switch configuration and trunk port settings
-
Verify firewall rules allow required traffic between PacketFence and network devices
9.5.1. Advanced Network Issues
-
Large Registration Network Issues: In large environments, check for ARP table overflow symptoms:
- DHCP not assigning IPs properly
- Failed pings in registration/quarantine VLANs
-
Check system logs:
dmesg | grep "Neighbour table overflow"
-
VLAN Segmentation: Ensure VLAN reaches from client to DHCP infrastructure to PacketFence server
-
Keepalived Issues: If virtual IP addresses aren’t working properly:
/usr/local/pf/bin/pfcmd service keepalived restart
9.6. Authentication Failures
If authentication fails for users or devices:
-
Check RADIUS audit log via Auditing → RADIUS Audit Log to trace authentication flow
-
Verify authentication source configuration in Configuration → Policies and Access Control → Authentication Sources
-
For Active Directory issues:
-
Verify domain join status:
realm list -
Check domain controller connectivity:
kinit username@DOMAIN.COM - Test LDAP connectivity from PacketFence server
-
Verify domain join status:
-
For external authentication sources (LDAP, RADIUS), verify network connectivity and credentials
-
Check that user/device exists in authentication source and has proper permissions
-
For certificate-based authentication (802.1X), verify:
- Certificate Authority (CA) configuration
- Certificate validity and expiration
- EAP-TLS profile settings
Advanced Active Directory Troubleshooting:
-
Domain Controller Failover: For multiple AD servers, ensure:
-
Set 'Sticky DC' parameter to
*in domain configuration - Specify multiple DNS servers alternating between availability zones
-
Example:
10.0.1.100,10.0.2.100,10.0.1.101,10.0.2.101
-
Set 'Sticky DC' parameter to
-
Winbindd Failover Issues: Some samba/winbindd versions don’t failover correctly:
- Enable monit to automatically restart winbindd on DC failures
- Monitor authentication failures and restart services when needed
-
Individual Machine Accounts: For cluster deployments, use individual machine accounts for each node to avoid secure connection binding issues
-
Certificate Issues: For ADCS/PKI integration:
- Apply required hotfixes before configuration
- Check for "The RPC Server is unavailable" errors after ADCS service restart
- Verify SSL certificate validity and hostname matching
9.7. RADIUS Debugging
Check FreeRADIUS logs at /usr/local/pf/logs/radius.log.
If needed, run FreeRADIUS in debug mode using these commands:
For the authentication radius process:
radiusd -X -d /usr/local/pf/raddb -n auth
For the accounting radius process:
radiusd -X -d /usr/local/pf/raddb -n acct
Additionally there is a raddebug tool that can extract debug logs from a
running FreeRADIUS daemon. PacketFence’s FreeRADIUS is pre-configured with
such support.
In order to have an output from raddebug, you need to either:
-
Make sure user
pfhas a shell in/etc/passwd, add/usr/sbinto PATH (export PATH=/usr/sbin:$PATH) and executeraddebugaspf -
Run
raddebugas root (less secure!)
Now you can run raddebug easily:
raddebug -t 300 -f /usr/local/pf/var/run/radiusd.sock
The above will output FreeRADIUS' authentication debug logs for 5 minutes.
Use the following to debug radius accounting:
raddebug -t 300 -f /usr/local/pf/var/run/radiusd-acct.sock
See man raddebug for all the options.
9.8. Log files
Log files are in /usr/local/pf/logs. Each service has its own log
file, except
packetfence.log which contains logs from multiple services. View complete log
file list via Audit → Live logs menu in web admin.
Main logging configuration is in /usr/local/pf/conf/log.conf.
Contains
packetfence.log configuration (Log::Log4Perl) - normally no modification
needed. Service-specific logging configurations are in
/usr/local/pf/conf/log.conf.d/.
Key Log Files for Troubleshooting:
-
packetfence.log: General PacketFence application logs -
radius.log: FreeRADIUS authentication and accounting logs -
mariadb.log: Database server logs (renamed from mariadb_error.log in v12+) -
httpd.apache: Apache web server logs (consolidated from multiple httpd logs in v12+)
Useful Log Monitoring Commands:
# Monitor live PacketFence logstail -f /usr/local/pf/logs/packetfence.log# Watch for database errorstail -f /usr/local/pf/logs/mariadb.log# Monitor RADIUS authenticationtail -f /usr/local/pf/logs/radius.log# Check system messages for hardware issuesdmesg | grep -i error# Real-time system log monitoringjournalctl -f
Log File Name Changes (v12.0+):
- MariaDB: mariadb_error.log → mariadb.log
- Apache logs: Multiple files consolidated to httpd.apache
9.9. Performance and Optimization Issues
Large Environment Considerations:
-
ARP Table Overflow: In large registration networks, symptoms include:
- DHCP not assigning IPs properly
- Failed pings in registration/quarantine VLANs
-
System log message: "Neighbour table overflow"
**Solution**: Increase kernel ARP cache settings in `/etc/sysctl.conf`:net.ipv4.neigh.default.gc_thresh1 = 2048net.ipv4.neigh.default.gc_thresh2 = 4096net.ipv4.neigh.default.gc_thresh3 = 8192sysctl -p
-
Database Connection Limits: For wireless environments with heavy RADIUS traffic:
- Increase MariaDB max_connections from default 100 to at least 300
- Monitor for "Too many connections" errors
- Check for "Host <hostname> is blocked" messages after connection timeouts
-
Memory and Resource Usage: Monitor system resources during peak usage:
# Check memory usagefree -m# Monitor active processestop -p $(pgrep -d',' -f packetfence)# Check disk spacedf -h /usr/local/pf/logs /var/lib/mysql
Guest Pre-registration Security:
- Pre-registration exposes PacketFence functionality on the Internet
- Apply critical OS updates and PacketFence security fixes
- Ensure valid MTA configuration for email relay
- Monitor /signup page access logs for suspicious activity
10. Commercial Support and Contact Information
For any questions or comments, do not hesitate to contact us by writing an email to: support@inverse.ca.
Akamai - Inverse team (https://www.packetfence.com) offers professional services around PacketFence to help organizations deploy the solution, customize, migrate versions or from another system, performance tuning or aligning with best practices.
Hourly rates or support packages are offered to best suit your needs.
Please visit https://www.packetfence.com for details.
11. GNU Free Documentation License
Please refer to https://www.gnu.org/licenses/fdl-1.2.txt for the full license.
12. Appendix
12.1. Glossary
- 'Alive quorum': An alive quorum is when more than 50% of the servers of the cluster are online and reachable on the network (pingable). This doesn’t imply they offer service, but only that they are online on the network.
-
'Hard-shutdown': A hard shutdown is when a node or a service is stopped
without being able to go through a proper exit cleanup. This can occur in
the case of a power outage, hard reset of a server or
kill -9of a service. -
'Management node/server': The first server of a PacketFence cluster as
defined in
/usr/local/pf/conf/cluster.conf. - 'Node': In the context of this document, a node is a member of the cluster while in other PacketFence documents it may represent an endpoint.
12.2. Database via ProxySQL or haproxy-db
In PacketFence 12.0, proxysql became the default way for PacketFence services to obtain their connection to a database member. ProxySQL has the ability to split reads and writes to different members which offers greater performance and scalability.
If using ProxySQL causes issues in the deployment,
revert back to using haproxy-db by changing database.port in conf/pf.conf to
3306.
Once that is changed on one of the cluster members, propagate the change using:
/usr/local/pf/bin/cluster/sync --as-master/usr/local/pf/bin/pfcmd configreload hard
And restart PacketFence on all cluster members:
/usr/local/pf/bin/pfcmd service pf restart
Additionally, pfconfig’s configuration can be changed to use haproxy-db as
well although its usage of the database is extremelly light. Still, to
change it for pfconfig, edit conf/pconfig.conf and change
mysql.port to 3306. After doing this change, restart pfconfig using
systemctl restart packetfence-config. Note that this change must be done on
all cluster members.
12.3. IP addresses in a cluster environment
12.3.1. DHCP and DNS services
In registration and isolation networks, each cluster member acts as a DHCP server. DNS configuration sent through DHCP contains physical IP address of each cluster member unless the option 'pfdns on VIP only' is enabled in Configuration → System Configuration → Cluster
12.3.2. SNMP clients
If SNMP is used in a cluster environment, allow physical IP addresses of all cluster members to query the network devices (switches, WiFi controllers, etc.).
VIP address of the cluster doesn’t need to be allowed in the network devices.
12.3.3. Disconnect and Change-of-Authorization (CoA) packets
Disconnect and Change-of-Authorization packets are sent from VIP address of RADIUS load-balancer. Only allow this IP address in the network devices.
12.4. Performing an upgrade on a cluster
In this procedure, the 3 nodes will be named A, B and C and they are in this
order in cluster.conf. When we referenced their hostnames, we
speak about hostnames in cluster.conf.
12.4.1. Backups
Re-importable backups will be taken during the upgrade process. We highly perform snapshots of all the virtual machines prior to the upgrade if possible.
12.4.2. Disabling the auto-correction of configuration
The PacketFence clustering stack has a mechanism that allows configuration conflicts to be handled accross the servers. This will come in conflict with the upgrade, so disable it.
In order to do so, go to Configuration → System Configuration → Maintenance and disable the Cluster Check task.
Once this is done, restart pfcron on all nodes using:
/usr/local/pf/bin/pfcmd service pfcron restart
12.4.3. Disabling galera-autofix
Disable the galera-autofix service in the configuration to
disable the automated resolution of cluster issues during the upgrade.
In order to do so, go to Configuration → System Configuration → Services
and disable the galera-autofix service.
Once this is done, stop galera-autofix service on all nodes using:
/usr/local/pf/bin/pfcmd service galera-autofix updatesystemd/usr/local/pf/bin/pfcmd service galera-autofix stop
12.4.4. Detaching and upgrading node C
In order to be able to work on node C, we first need to stop all the PacketFence application services on it:
/usr/local/pf/bin/pfcmd service pf stop
packetfence-config should stay started in order to run
/usr/local/pf/bin/cluster/node commands.In the next following steps, upgrade PacketFence on node C.
Detach node C from the cluster
First, we need to tell A and B to ignore C in their cluster configuration.
In order to do so, execute the following command on A and B while changing
node-C-hostname with the actual hostname of node C:
/usr/local/pf/bin/cluster/node node-C-hostname disable
Once this is done proceed to restart the following services on nodes A and B one at a time. This will cause service failure during the restart on node A
/usr/local/pf/bin/pfcmd service radiusd restart/usr/local/pf/bin/pfcmd service pfdhcplistener restart/usr/local/pf/bin/pfcmd service haproxy-admin restart/usr/local/pf/bin/pfcmd service haproxy-db restart/usr/local/pf/bin/pfcmd service proxysql restart/usr/local/pf/bin/pfcmd service haproxy-portal restart/usr/local/pf/bin/pfcmd service keepalived restart
Then, we should tell C to ignore A and B in their cluster configuration. In
order to do so, execute the following commands on node C while changing
node-A-hostname and node-B-hostname by the hostname of nodes A and B
respectively.
/usr/local/pf/bin/cluster/node node-A-hostname disable/usr/local/pf/bin/cluster/node node-B-hostname disable
Now restart packetfence-mariadb on node C:
systemctl restart packetfence-mariadb
The commands above will make sure that nodes A and B will not be forwarding requests to C even if it is alive. Same goes for C which won’t be sending traffic to A and B. This means A and B will continue to have the same database informations while C will start to diverge from it when it goes live. We’ll make sure to reconcile this data afterwards.
Upgrade node C
From that moment node C is in standalone for its database. We can proceed to update the packages, configuration and database schema. In order to do so, apply the upgrade process described here on node C only.
Check upgrade on node C
Prior to migrating the service on node C, run a checkup of the configuration to validate the upgrade. In order to do so, perform:
systemctl start packetfence-proxysql/usr/local/pf/bin/pfcmd checkup
Review the checkup output to ensure no errors are shown. Any 'FATAL' error will prevent PacketFence from starting up and should be dealt with immediately.
Stop services on nodes A and B
Next, stop all application services on node A and B:
/usr/local/pf/bin/pfcmd service pf stop
systemctl stop packetfence-mariadb
packetfence-config should stay started in order to run
/usr/local/pf/bin/cluster/node commands.Start service on node C
Now, start the application service on node C using the instructions provided in Restart PacketFence services section.
12.4.5. Validate migration
Node C should now have full service and all functionnalities should be validated as working as expected. Once continuing past this point, there will be no way to migrate back to nodes A and B in case of issues other than to use the snapshots taken prior to the upgrade.
If all goes wrong
If the migration to node C goes wrong, fail back to nodes A and B by stopping all services on node C and starting them on nodes A and B
systemctl stop packetfence-mariadb/usr/local/pf/bin/pfcmd service pf stop
systemctl start packetfence-mariadb/usr/local/pf/bin/pfcmd service pf start
Once confident to try the failover to node C again, do the exact opposite of the commands above to try the upgrade again.
If all goes well
If the state of the upgrade on node C is satisfactory, move on to upgrading the other nodes.
/usr/local/pf/bin/cluster/node node-B-hostname disable
/usr/local/pf/bin/cluster/node node-A-hostname disable
export UPGRADE_CLUSTER_SECONDARY=yessystemctl restart packetfence-mariadb
Then, apply the upgrade process described here on nodes A and B.
export so that the environment variable is properly taken into consideration when the upgrade script executes.Configuration synchronisation
Now sync the configuration by running the following on nodes A and B
/usr/local/pf/bin/cluster/sync --from=192.168.1.5 --api-user=packet --api-password=anotherMoreSecurePassword/usr/local/pf/bin/pfcmd configreload hard
Where:
-
192.168.1.5is the management IP of node C -
packetis the webservices username (Configuration → Integration → Web Services) -
anotherMoreSecurePasswordis the webservices password (Configuration → Integration → Web Services)
12.4.6. Reintegrating nodes A and B
Optional step: Cleaning up data on node C
When re-establishing a cluster using node C in the steps below, the environment will be set in read-only mode for the duration of the database sync (which needs to be done from scratch).
This can take from a few minutes to an hour depending on the database size.
Highly recommend deleting data from the following tables if not needed:
-
radius_audit_log: contains the data in Auditing→RADIUS Audit Logs -
ip4log_history: Archiving data for the IPv4 history -
ip4log_archive: Archiving data for the IPv4 history -
locationlog_history: Archiving data for the node location history
Data from all of these tables can be safely deleted without affecting the functionnalities as they are used for reporting and archiving purposes. Deleting the data from these tables can make the sync process considerably faster.
In order to truncate a table:
mysql -u root -p pfMariaDB> truncate TABLE_NAME;
Elect node C as database master
Now that all the members are ready to reintegrate the cluster, run the following commands on all cluster members
/usr/local/pf/bin/cluster/node node-A-hostname enable/usr/local/pf/bin/cluster/node node-B-hostname enable/usr/local/pf/bin/cluster/node node-C-hostname enable
Now, stop packetfence-mariadb on node C, regenerate the MariaDB configuration and start it as a new master:
systemctl stop packetfence-mariadb/usr/local/pf/bin/pfcmd generatemariadbconfigsystemctl set-environment MARIADB_ARGS=--force-new-clustersystemctl restart packetfence-mariadb
Validate that connection to the MariaDB database is possible even though it is in read-only mode using the MariaDB command line:
mysql -u root -p pf -h localhost
If not, check the MariaDB log
(/usr/local/pf/logs/mariadb.log)
Sync nodes A and B
On each of the servers to discard the data from, stop packetfence-mariadb, destroy all the data in /var/lib/mysql and start packetfence-mariadb so it resyncs its data from scratch.
systemctl stop packetfence-mariadbrm -fr /var/lib/mysql/*systemctl start packetfence-mariadb
Should there be any issues during the sync, check the MariaDB log (/usr/local/pf/logs/mariadb.log)
Once both nodes have completely synced (try connecting to it using the MariaDB command line). Once all members are confirmed as joined to the MariaDB cluster, perform the following on node C
systemctl stop packetfence-mariadbsystemctl unset-environment MARIADB_ARGSsystemctl start packetfence-mariadb
Start nodes A and B
Now safely start PacketFence on nodes A and B using the instructions provided in Restart PacketFence services section.
haproxy-admin service need to be restarted manually on both nodes
after all services have been restarted:
/usr/local/pf/bin/pfcmd service haproxy-admin restart
12.4.7. Restart node C
Now, restart PacketFence on node C using the instructions provided in Restart PacketFence services section. So it becomes aware of its peers again.
All 3 nodes should now have full service using the latest version of PacketFence.
12.4.8. Reactivate the configuration conflict handling
Now that the cluster is back to a healthy state, reactivate the configuration conflict resolution.
In order to do so, go to Configuration → System Configuration → Maintenance and re-enable the Cluster Check task.
Once this is done, restart pfcron on all nodes using:
/usr/local/pf/bin/pfcmd service pfcron restart
12.4.9. Reactivate galera-autofix
Now reactivate and restart the galera-autofix service so that it’s aware that all the members of the cluster are online again.
In order to do so, go to Configuration → System Configuration → Services and re-enable the galera-autofix service.
Once this is done, restart galera-autofix service on all nodes using:
/usr/local/pf/bin/pfcmd service galera-autofix updatesystemd/usr/local/pf/bin/pfcmd service galera-autofix restart
12.5. MariaDB Galera cluster troubleshooting
12.5.1. Maximum connections reached
In the event that one of the 3 servers reaches the maximum amount of
connections (defaults to 1000), this will deadlock the Galera cluster
synchronization. In order to resolve this, first increase
database_advanced.max_connections, then stop packetfence-mariadb on all 3
servers, and follow the steps in the section None of the nodes is offering database service
of this document. Note that any of the database servers can be used as the
source of truth.
12.5.2. Investigating further
The limit of 1000 connections is fairly high already so if the maximum number of connections is reached, this might indicate an issue with the database cluster. If this issue happens often, monitor the active connections and their associated queries to find out what is using up the connections.
Monitor the active TCP connections to MariaDB using this command and then investigate the processes that are connected to it (last column):
# netstat -anlp | grep 3306
Get an overview of all the current connections using the following MariaDB query:
MariaDB> select * from information_schema.processlist;
And to see only the connections with an active query:
MariaDB> select * from information_schema.processlist where Command!='Sleep';
12.6. From Cluster to Standalone
Since packetfence v14.1, going from a cluster to a standlone can be done by
using the exportable backup script and/or a backup file in /root/backup.
Once the importation is done on the new standalone server, it is important:
- to remove the file /var/lib/mysql/grastate.dat because this file is used to
do or not the backup on a cluster member. If the file is still there, the backup script will fail.
- to check if all references to cluster have been removed and the VIP has been well transfered to the server in the configuration.